Eclipse 4.4 (Luna) 免安装
https://sourceforge.net/projects/eclipseportable/
安装不了 Maven, 拿来学习用还行, 但用于开发的还是去安装原装
其实跟免安装差不多, 只要记得将 %USERPROFILE% 中的
.android / .p2 / .eclipse / .m2 文件夹备份就好
https://eclipse.org/downloads/
Netbeans 8.0 免安装
https://sourceforge.net/projects/nbportable/
已包含 Maven, 虽然版本有点旧, 但可以用
不喜欢的话, 就安装原装咯
https://netbeans.org/downloads/
原装则备份 %USERPROFILE%/.nbi 文件夹
广告
本站里的文章大部分经过自行整理与测试
2016年3月31日星期四
百度云 - WAP 版网站
http://pan.baidu.com/wap/home
PC 进入WAP 版网站的方法,
在 Windows 7 曾尝试用如 IE 11, 360安全浏览器 8.1, Chrome 49, Opera 36,
甚至用上了插件 user agent switcher,
但目前只发现能用 firefox 进入, 而不会自动转向网络版
http://pan.baidu.com/disk/home
至于 Linux 如 Ubuntu, 可以用 google chrome 或 firefox 进入
2016年3月30日星期三
DropboxPortableAHK 1.6.8.10 BETA
http://nionsoftware.com/dbpahk/
DropboxPortableAHK 1.6.8.10 BETA 终于来了
下载连接就在论坛上的第一楼
https://groups.google.com/forum/#!topic/dropboxportableahk/nZrBsZYokz8
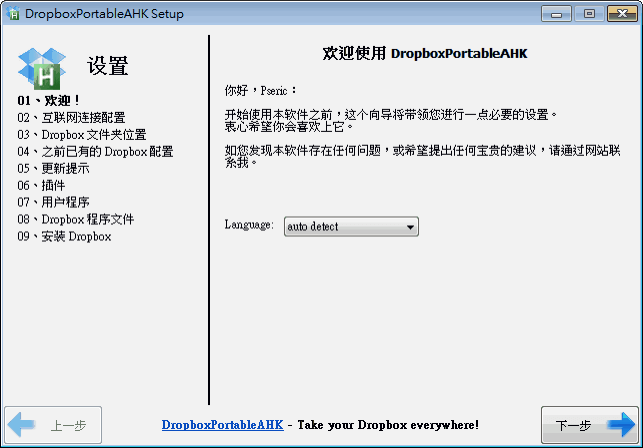
可以用最新的 Dropbox 3.16.1, 只不过是免安装
如图, 安装 Dropbox 后, 程序就在 DropboxPortableAHK\.dbfiles\bin\Dropbox
可以将这个 Dropbox 移出来, 主程序就在以上的 Dropbox\Client\Dropbox.exe
再配合以下做法
http://jasonmun.blogspot.my/2016/03/windows-7-2dropbox.html
一样能在 Windows 7 同时用上 2个 Dropbox
2016年3月29日星期二
Google Chrome - Flash Player 更新 / 语言转换
Google Chrome
内置 Adobe Flash Player 更新
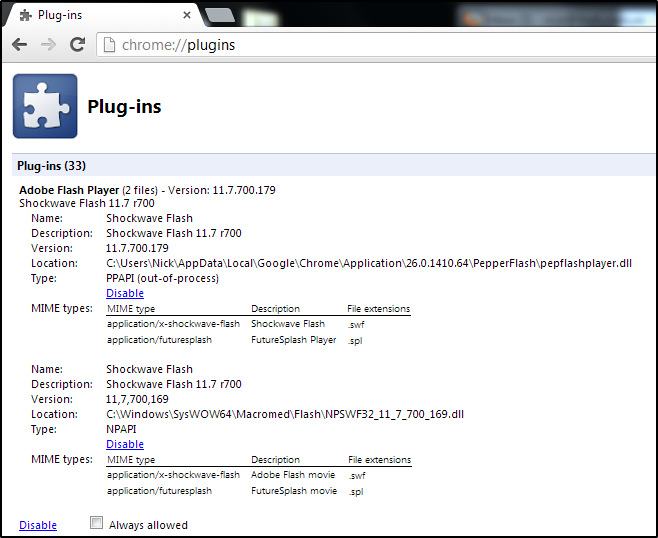
chrome://components, 按所有的 Check for update 等待检查, 下载与更新元件
chrome://plugins, Disable 掉旧的 Adobe Flash Player
语言转换
Settings - Languages - Manage languages
- Chinese (Simplified) - Display Google Chrome in this language
设置 - 语言 - 管理语言
- 英文 (美国) - English (United States) - 以这种语言显示 Google Chrome
如果没有所要的语言, 可以添加
所以, 就算下载错了语言版本也不是问题,
去改一改语言设置就行了
PortableApps 免安装程序下载
http://portableapps.com/
免安装程序管理工具, 里面包含了很多不错的小软件
如 Google Chrome, Mozilla Firefox, Opera, GIMP, Skype, LibreOffice,
OpenOffice, Teamviewer, VLC Media Player, Foxit Reader, Putty, KeePass, Pidgin,
NotePad++ 等等
完整的软件列表
http://portableapps.com/apps
下载后的软件可以移到其它地方用, 可以不需要或启动以上管理工具
不安装也行, 直接在以下下载所要的软件
http://mirror.ufs.ac.za/portableapps/
https://sourceforge.net/projects/portableapps/files/
2016年3月28日星期一
jPortable - JAVA 免安装运行库
jPortable (32 bit / 64 bit) 也就是 JAVA 的运行库 (Java Runtime Environment),
但不同的是它可携带 (portable), 即免安装.
http://portableapps.com/apps/utilities/java_portable
将运行库安装到 C:\
要用这个运行库, 要在
Control Panel - System - Advanced system settings - Advanced - Environment Variables...
- System variables - Path - Edit...
如果是 32-bit, 将 ;C:\CommonFiles\Java\bin;
如果是 64-bit, 将 ;C:\CommonFiles\Java64\bin;
写到 System variables 的 Path 中. 这样 OS 才会知道你的运行库在那里
( 建议 64-bit 用户连同 32-bit 也安装 )
在 Start - run - 输入 cmd - 输入 java -version
看到以下信息, 就可知道安装成功了
java version "1.8.0_77"
Java(TM) SE Runtime Environment (build 1.8.0_77-b03)
Java HotSpot(TM) 64-Bit Server VM (build 25.77-b03, mixed mode)
2016年3月27日星期日
支持 NPAPI 最后版本浏览器
支持 NPAPI 最后版本浏览器
Internet Explorer
Internet Explorer 11 (64-bit / 32-bit)
internet-explorer-11-for-windows-7-details.aspx
经过检测, IE11是支持 NPAPI 的, 由于 Microsoft 没表态.
所以还不知道以后版本中会否继续支持..
Google Chrome
Google Chrome 41.0.2272.118 免安装版 (64-bit / 32-bit)
GoogleChromePortable64_41.0.2272.118_azo.exe.htm
GoogleChromePortable32_41.0.2272.118_azo.exe.htm
Google Chrome 42.0.2311.90 - 44.0.2403.157 免安装版 (64-bit / 32-bit)
http://azodl.blogspot.my/2015/04/google-chrome-portable.html
- 需要自行启动 chrome://flags/#enable-npapi
- Enable NPAPI Mac, Windows - Enable
重启后, 虽然 NPAPI 能让 Java, Silverlight 等其它 plugin 运行,
但每次运行都会出现以下提示
所以, 本人还是建议用回 41.0.2272.118 版本
也可到以下下载
portableapps/Google Chrome Portable/
Mozilla Firefox
Mozilla Firefox 42 免安装版
portableapps/Mozilla Firefox, Portable Ed./Mozilla Firefox, Portable Edition 42.0/
Opera
Opera 33.0.1990.115 免安装版
http://azodl.blogspot.my/2015/04/opera.html
恢复 CHROME 的 NPAPI 功能
从 Google Chrome v45 开始, 已停止支持 NPAPI.
Netscape Plugin Application Programming Interface (NPAPI)
是一个跨平台的通用浏览器插件应用程序接口 (API).
1995年由 Netscape 公司发布, 应用于 Netscape Navigator v2.0
但其他浏览器很快也跟进支持, 成为一个共通的插件标准,
与微软的ActiveX形成竞争关系
每个插件声明自己支持某一种或几种内容类型 ( 例如“audio/mp3”),
当浏览器遇到这种类型的内容时,便在插件库寻找一种能够解码的插件,
将这部分内容交由其解析, 并在网页对应的位置中显示出来
早前, 有人发布了恢复补丁 RecoveryNPAPI
如其名, 它能恢复 CHROME 的 NPAPI 功能.
用法很简单, 只要运行 RecoveryNPAPI.exe, 打开
C:\Program Files (x86)\Google\Chrome\Application\49.0.2623.108\chrome.dll
即可. 补丁会备份原本的 chrome.dll 为 chrome.dll.bak
http://www.liangchan.net/liangchan/7495.html
* Menu -> Help -> About Google Chrome -> Version 49.0.2623.108 (64-bit)
检查是否写着 64-bit, 没写的是属于 32-bit. 因为这补丁只支持 32-bit 而已
* 有了 NPAPI, 也就可以安装与支持 Java Runtime Environment (32-bit)
最新稳定版
http://www.azofreeware.com/2008/09/google-chrome.html
最新免安装版
http://www.azofreeware.com/2010/01/google-chrome-portable-4024978.html
2016年3月23日星期三
JAR 转 EXE
以 Eclipse Mars 为例, right click project.., 按 Export...
1. Select
Select an export destination:
- 1.1.1) 选 Java 里的 JAR file
或
- 1.2.1) 选 Java 里的 Runnable JAR file (如果有用其它 JAR library)
按 Next >
1.1.2. JAR File Specification
Select the export destination: JAR file: C:\*.jar
按 Next >
按 Next >
1.1.3. JAR Manifest Specification
a) Specify the manifest: 选 Generate the manifest file
b) Seal contents: 选 Seal some packages
c) Select the class of the application entry point: Main class: 例子 com.*.mainClass
按 Finish
1.2.2) Runnable JAR File Specification
a) Launch configuration: 例子 mainClass-Name - Project-Name
b) Export destination: C:\*.jar
c) Library handling: 选 Extract required libraries into generated JAR
按 Finish
2. JAR 档案完成后, 去下载 launch4j-3.8-win32.zip
http://launch4j.sourceforge.net/
运行 launch4j.exe
a) Basic - Output file - C:\*.exe
b) Basic - Jar - C:\*.jar
c) Header - GUI / Console
d) JRE - Search options - Min JRE version: 1.0.0
e) 按图标 Save configuration - 存你所设定的 config files (.xml, .cfg)
f) 按图标 Build wrapper
Log 会显示 Successfully created C:\*.exe
2016年3月20日星期日
在 Windows 7 同时用 2个Dropbox
假设你在 Windows Account (用户名A) (administrator) 已安装了 Dropbox 在用着
1. 去 Control Panel - User Accounts - Manage another account -
Create a new account (Standard User) - 用户名B
2. 点选该新的 account, 给它弄个登入密码 (Create a password)
3. Switch user, 进入这个 Windows Account (用户名B),
运行 Dropbox 和去 Sign In 用其它 Dropbox 户口, 确保能使用
(将 Dropbox 文件夹 设定在 C:\Users\用户名B\Dropbox)
4. 完成后, Switch user, 用回原来的 Windows Account (用户名A)
5. 用 Notepad 写个 dropbox.bat, 内容如下
runas /user:用户名B /savecred "C:\Program Files (x86)\Dropbox\Client\Dropbox.exe"
(说明: 以用户名B的户口来运行 dropbox 主程序)
6. 点击这个 bat, 就可以同时用第2个 Dropbox 了
(第一次, 会要求输入用户名B的登入密码)
7. 给 Dropbox 文件夹 (C:\Users\用户名B\Dropbox) 增加权限
- 将用户名B的私人用文件夹设定成公众用
Dropbox Properties - Security - Group or user names - Edit...
- Add
a) 写入 Authenticated Users, Check Names, OK
b) 写入 Users, Check Names, OK
在 Group or user names 选上
c) Authenticated Users, 给与权限 Modify/Read & execute/List folder contents/Read/Write
d) Users, 给与权限 Read & execute/List folder contents/Read
2016年3月15日星期二
Windows 7 - 图标不能显示
有时图标可能会突然显示不了.
这原因是缓冲文件 IconCache.db 没有得到自动更新.
解决方法是撤了该文件, 让系统自行再造一个就行了.
1. 关闭与储存所有正在进行中的作业
2. Start - Run - 输入 cmd
3. 运行以下 4 行
taskkill /IM explorer.exe /F
DEL "%localappdata%\IconCache.db" /A
DEL "%localappdata%\Microsoft\Windows\Explorer\iconcache*" /A
shutdown /r /f /t 00
https://technet.microsoft.com/en-us/library/cc754340.aspx
2016年3月11日星期五
2016年3月9日星期三
ISO 转 USB
1. UltraISO
http://tw.ezbsystems.com/ultraiso/download.htm
2. 用 UltraISO 打开 ISO (File - Open - *.iso)
3. 插入 USB Stick
4. 选 Bootable - Write Disk Image...
5. Format USB ( 选 FAT32 (Default) )
http://tw.ezbsystems.com/ultraiso/download.htm
2. 用 UltraISO 打开 ISO (File - Open - *.iso)
3. 插入 USB Stick
4. 选 Bootable - Write Disk Image...
5. Format USB ( 选 FAT32 (Default) )
6. 选择 Write Method:USB-HDD+, 然后 write
7. 等待制作完成.
USB 转 ISO
1. ImgBurn
http://www.imgburn.com/index.php?act=download
2. 插入 bootable USB stick (F:\)
3. 启动 ImgBurn
4. 选 "Create image file from files / folders"
5. "Source" browse to your USB stick (F:\)
6. "Destination" 选要存 ISO 的地方 (C:\*.iso)
7. "Advanced - Bootable Disc"
Options ->
- 点选 Make Bootable Image
- Boot image : F:\boot\etfsboot.com
- Developer ID : "Microsoft Corporation"
- Load Segment : "07C0"
- Sectors To Load :
输入 4 (当 F:\boot\etfsboot.com 的容量是 2K) (2048 / 512 = 4)
输入 8 (当 F:\boot\etfsboot.com 的容量是 4K) (4096 / 512 = 8)
8. 按图 Build, 等待制作完成.
WINDOWS 7 SP1 ISO 更换 IE7 为 IE11
准备的软件
1. UltraISO
2. Windows 7 CD/ISO 英文版 - sources\install.wim
3. IE11-Windows6.1-x86-en-us.exe (32-bits) / IE11-Windows6.1-x64-en-us.exe (64-bits)
https://www.microsoft.com/en-us/download/internet-explorer-11-for-windows-7-details.aspx
4. Windows6.1-KB2670838-x86.msu (32-bits) / Windows6.1-KB2670838-x64.msu (64-bits)
https://www.microsoft.com/en-us/download/details.aspx?id=36805
根据 Windows 7 版本来决定以下该用 -x86 (32-bits) / -x64 (64-bits) 和语言
1. 解压 IE11 到 d:\IE11
cd "c:\" ( 假设 IE11-Windows6.1-x86-en-us.exe 存在于 c:\ )
IE11-Windows6.1-x86-en-us.exe /x:d:\IE11
2. 检查 c:\win7\install.wim
(UltraISO -> 打开 Window 7 CD/ISO -> 复制 sources\install.wim 到 c:\win7)
dism /get-wiminfo /wimfile:c:\win7\install.wim
3. 挂载 c:\win7\install.wim 到 c:\win7\wim
dism /mount-wim /wimfile:c:\win7\install.wim /name:"Windows 7 HOMEPREMIUM" /mountdir:c:\win7\wim
以上 name 系数值可在步骤 2 取得.
4. 加入 patch (c:\Windows6.1-KB2670838-x86.msu)
dism /Image:c:\win7\wim /add-package /packagepath:c:\Windows6.1-KB2670838-x86.msu
5. 整合 IE11
dism /image:c:\win7\wim /add-package /packagepath:d:\IE11\IE-Win7.CAB
dism /image:c:\win7\wim /add-package /packagepath:d:\IE11\IE-Hyphenation-en.MSU
dism /image:c:\win7\wim /add-package /packagepath:d:\IE11\IE-Spelling-en.MSU
如果是 IE11-Windows6.1-x86-zh-cn.exe (Windows 7 SP1 中文版), 多安装以下IE的语言包..
dism /image:c:\win7\wim /add-package /packagepath:d:\IE11\ielangpack-zh-CN.CAB
6. 结束挂载
dism /unmount-wim /mountdir:c:\win7\wim /commit
7. 将 c:\win7\install.wim 覆盖掉原来的 Window 7 CD/ISO -> sources\install.wim
订阅:
评论 (Atom)


.svg/1280px-Dropbox_logo_(September_2013).svg.png)
