1) 检查是否用着 wayland
$ echo $XDG_SESSION_TYPE
wayland
其实, 也可以 logout 选择 x11
2) 添加
$ xhost +si:localuser:root
3) 尝试打开 gufw
$ sudo gufw
2019年2月27日星期三
2019年2月25日星期一
Boxcryptor Classic 文件夹(*.bc) 转成 Encfs 挂载

https://launchpad.net/~gencfsm/+archive/ubuntu/ppa
1) 安装 Gnome EncFS Manager
$ sudo add-apt-repository ppa:gencfsm/ppa
$ sudo apt-get update
$ sudo apt install gnome-encfs-manager
2) 将 BoxCryptor Classic 文件夹 (*.bc) 转去 EncFS 用
$ cd ~/Boxcryptor-Classic-folder.bc
$ cp Keyfile.bcx .encfs6.xml
3) Gnome Encfs Manager
在 Directory or drive to encrypt or import 添加 *.bc 所在处
(挂载, 需要密码)
2019年2月24日星期日
PGP: 实现对主副私钥分离
1) PGP 专业模式私钥生成
一般用 PGP 工具生成的私钥,
它的主私钥用于 Certify (核证) 和 Sign (签名),
副私钥则用于 Encrypt (加密)
不过, 我们用 Sign 和 Encrypt 这两部分,
Certify 是当加或撤副私钥时才有用 (编辑)
我们可以生成主私钥用于 Certify (核证),
和2个副私钥则分别用于 Sign (签名) 和 Encrypt (加密)
https://jasonmun.blogspot.com/2019/02/pgp.html
2) 输出保存
公钥可发布给人或放到 keyserver
$ gpg2 -a -o pub.asc --export '<email>'
私钥, 需要解密时用 (重要)
$ gpg2 -a -o pri_ascii.asc --export-secret-keys '<email>'
$ gpg2 -o pri_binary_pgp --export-secret-keys '<email>'
如果打算将公钥放去 keyserver,建议生成..
以便以后可撤销 keyserver 中的公钥
$ gpg2 -o revoke.asc --gen-revoke '<email>'
只输出2个副私钥, 不包含主私钥
$ gpg2 --export-secret-subkeys <SUB_KEY_1>! <SUB_KEY_2>! > exported_subkeys
3) 实现主副私钥分离
$ gpg2 --delete-secret-keys '<email>'
$ gpg2 --delete-keys '<email>'
$ gpg2 --import exported_subkeys
(如果不要分离, 可输入 pri_ascii.asc 或 pri_binary_pgp 私钥文件)
列出所有 KEY (如果出现 sec#, 即代表主私钥没有放入)
$ gpg2 --list-secret-keys --keyid-format long
没有了主私钥, 会发现 gpg 下, addkey 和 delkey 都不能用了..
但能用 trust, 将状态 unknow 改为 Ultimate, 然后 save
4) 加密与解密
收到 PGP 加密邮件, 将加密内容存成 a.txt.pgp
解密 a.txt.pgp >> a.txt
$ gpg2 -o a.txt -d a.txt.pgp
加密 a.txt >> a.txt.pgp
$ gpg2 -r <uid> -o a.txt.pgp -e a.txt
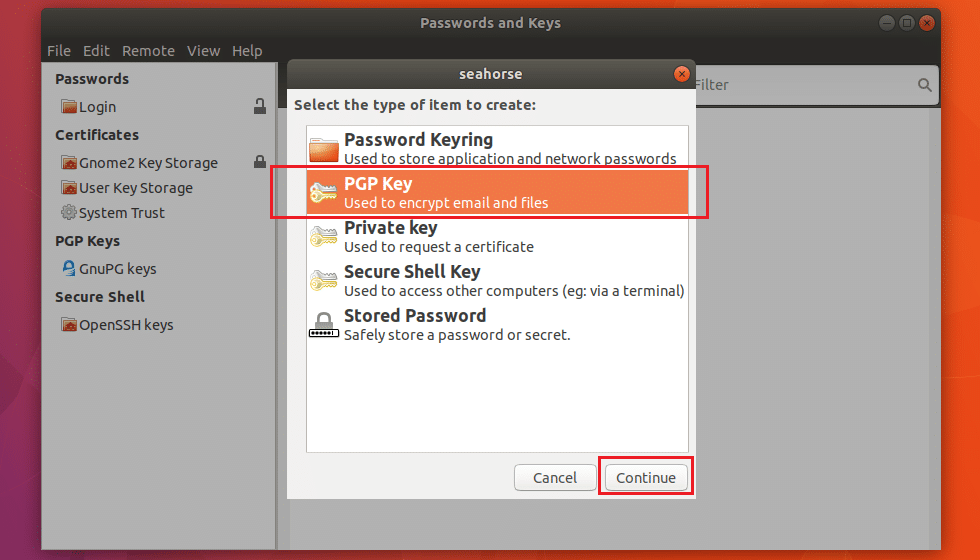
安装了以下, nautilus 上文件夹或文件上,
右按滑鼠会多了 Encrypt / Decrypt / Sign 的选择
5) GNOME上安装 seahorse
$ sudo apt install seahorse seahorse-nautilus
* import 私钥或安装后, 建议重新 login GNOME..
一般用 PGP 工具生成的私钥,
它的主私钥用于 Certify (核证) 和 Sign (签名),
副私钥则用于 Encrypt (加密)
不过, 我们用 Sign 和 Encrypt 这两部分,
Certify 是当加或撤副私钥时才有用 (编辑)
我们可以生成主私钥用于 Certify (核证),
和2个副私钥则分别用于 Sign (签名) 和 Encrypt (加密)
https://jasonmun.blogspot.com/2019/02/pgp.html
2) 输出保存
公钥可发布给人或放到 keyserver
$ gpg2 -a -o pub.asc --export '<email>'
私钥, 需要解密时用 (重要)
$ gpg2 -a -o pri_ascii.asc --export-secret-keys '<email>'
$ gpg2 -o pri_binary_pgp --export-secret-keys '<email>'
如果打算将公钥放去 keyserver,建议生成..
以便以后可撤销 keyserver 中的公钥
$ gpg2 -o revoke.asc --gen-revoke '<email>'
只输出2个副私钥, 不包含主私钥
$ gpg2 --export-secret-subkeys <SUB_KEY_1>! <SUB_KEY_2>! > exported_subkeys
3) 实现主副私钥分离
$ gpg2 --delete-secret-keys '<email>'
$ gpg2 --delete-keys '<email>'
$ gpg2 --import exported_subkeys
(如果不要分离, 可输入 pri_ascii.asc 或 pri_binary_pgp 私钥文件)
列出所有 KEY (如果出现 sec#, 即代表主私钥没有放入)
$ gpg2 --list-secret-keys --keyid-format long
没有了主私钥, 会发现 gpg 下, addkey 和 delkey 都不能用了..
但能用 trust, 将状态 unknow 改为 Ultimate, 然后 save
4) 加密与解密
收到 PGP 加密邮件, 将加密内容存成 a.txt.pgp
解密 a.txt.pgp >> a.txt
$ gpg2 -o a.txt -d a.txt.pgp
加密 a.txt >> a.txt.pgp
$ gpg2 -r <uid> -o a.txt.pgp -e a.txt
安装了以下, nautilus 上文件夹或文件上,
右按滑鼠会多了 Encrypt / Decrypt / Sign 的选择
5) GNOME上安装 seahorse
$ sudo apt install seahorse seahorse-nautilus
* import 私钥或安装后, 建议重新 login GNOME..
PGP 秘钥生成
1) 以专业模式生成主秘钥 (公钥与私钥)
------------------------------
$ gpg2 --expert --full-gen-key
gpg (GnuPG) 2.2.4; Copyright (C) 2017 Free Software Foundation, Inc.
This is free software: you are free to change and redistribute it.
There is NO WARRANTY, to the extent permitted by law.
Please select what kind of key you want:
(1) RSA and RSA (default)
(2) DSA and Elgamal
(3) DSA (sign only)
(4) RSA (sign only)
(7) DSA (set your own capabilities)
(8) RSA (set your own capabilities)
(9) ECC and ECC
(10) ECC (sign only)
(11) ECC (set your own capabilities)
(13) Existing key
Your selection? 8
Possible actions for a RSA key: Sign Certify Encrypt Authenticate
Current allowed actions: Sign Certify Encrypt
(S) Toggle the sign capability
(E) Toggle the encrypt capability
(A) Toggle the authenticate capability
(Q) Finished
Your selection? s (关掉 Sign)
Possible actions for a RSA key: Sign Certify Encrypt Authenticate
Current allowed actions: Certify Encrypt
(S) Toggle the sign capability
(E) Toggle the encrypt capability
(A) Toggle the authenticate capability
(Q) Finished
Your selection? e (关掉 Encrypt)
Possible actions for a RSA key: Sign Certify Encrypt Authenticate
Current allowed actions: Certify
(S) Toggle the sign capability
(E) Toggle the encrypt capability
(A) Toggle the authenticate capability
(Q) Finished
Your selection? q
RSA keys may be between 1024 and 4096 bits long.
What keysize do you want? (3072) 4096
Requested keysize is 4096 bits
Please specify how long the key should be valid.
0 = key does not expire
<n> = key expires in n days
<n>w = key expires in n weeks
<n>m = key expires in n months
<n>y = key expires in n years
Key is valid for? (0) 0
Key does not expire at all
Is this correct? (y/N) y
GnuPG needs to construct a user ID to identify your key.
Real name: Bat Guys
Email address: <email>
Comment:
You selected this USER-ID:
"Bat Guys <email>"
Change (N)ame, (C)omment, (E)mail or (O)kay/(Q)uit? o (需要输入一个密码)
We need to generate a lot of random bytes. It is a good idea to perform
some other action (type on the keyboard, move the mouse, utilize the
disks) during the prime generation; this gives the random number
generator a better chance to gain enough entropy.
gpg: key <MASTER_KEY_0> marked as ultimately trusted
gpg: revocation certificate stored as '/home/bat/.gnupg/openpgp-revocs.d/<Master_Key>.rev'
public and secret key created and signed.
pub rsa4096 2019-02-23 [C]
<Master_Key>
uid Bat Guys <email>
2) 添加 2个 subkey (S,E)
---------------------------------
$ gpg2 --expert --edit-key '<email>'
gpg (GnuPG) 2.2.4; Copyright (C) 2017 Free Software Foundation, Inc.
This is free software: you are free to change and redistribute it.
There is NO WARRANTY, to the extent permitted by law.
Secret key is available.
gpg: checking the trustdb
gpg: marginals needed: 3 completes needed: 1 trust model: pgp
gpg: depth: 0 valid: 1 signed: 0 trust: 0-, 0q, 0n, 0m, 0f, 1u
sec rsa4096/<MASTER_KEY_0>
created: 2019-02-23 expires: never usage: C
trust: ultimate validity: ultimate
[ultimate] (1). Bat Guys <email>
2.1) 第1个 Sub Key (S - Sign)
------------------------------
gpg> addkey
Please select what kind of key you want:
(3) DSA (sign only)
(4) RSA (sign only)
(5) Elgamal (encrypt only)
(6) RSA (encrypt only)
(7) DSA (set your own capabilities)
(8) RSA (set your own capabilities)
(10) ECC (sign only)
(11) ECC (set your own capabilities)
(12) ECC (encrypt only)
(13) Existing key
Your selection? 8
Possible actions for a RSA key: Sign Encrypt Authenticate
Current allowed actions: Sign Encrypt
(S) Toggle the sign capability
(E) Toggle the encrypt capability
(A) Toggle the authenticate capability
(Q) Finished
Your selection? e (关掉 Encrypt)
Possible actions for a RSA key: Sign Encrypt Authenticate
Current allowed actions: Sign
(S) Toggle the sign capability
(E) Toggle the encrypt capability
(A) Toggle the authenticate capability
(Q) Finished
Your selection? q
RSA keys may be between 1024 and 4096 bits long.
What keysize do you want? (3072) 4096
Requested keysize is 4096 bits
Please specify how long the key should be valid.
0 = key does not expire
<n> = key expires in n days
<n>w = key expires in n weeks
<n>m = key expires in n months
<n>y = key expires in n years
Key is valid for? (0) 0
Key does not expire at all
Is this correct? (y/N) y
Really create? (y/N) y (输入之前的密码)
We need to generate a lot of random bytes. It is a good idea to perform
some other action (type on the keyboard, move the mouse, utilize the
disks) during the prime generation; this gives the random number
generator a better chance to gain enough entropy.
sec rsa4096/<MASTER_KEY_0>
created: 2019-02-23 expires: never usage: C
trust: ultimate validity: ultimate
ssb rsa4096/<SUB_KEY_1>
created: 2019-02-23 expires: never usage: S
[ultimate] (1). Bat Guys <email>
2.2) 第2个 Sub Key (E - Encrypt)
--------------------------------
gpg> addkey
Please select what kind of key you want:
(3) DSA (sign only)
(4) RSA (sign only)
(5) Elgamal (encrypt only)
(6) RSA (encrypt only)
(7) DSA (set your own capabilities)
(8) RSA (set your own capabilities)
(10) ECC (sign only)
(11) ECC (set your own capabilities)
(12) ECC (encrypt only)
(13) Existing key
Your selection? 8
Possible actions for a RSA key: Sign Encrypt Authenticate
Current allowed actions: Sign Encrypt
(S) Toggle the sign capability
(E) Toggle the encrypt capability
(A) Toggle the authenticate capability
(Q) Finished
Your selection? s (关掉 Sign)
Possible actions for a RSA key: Sign Encrypt Authenticate
Current allowed actions: Encrypt
(S) Toggle the sign capability
(E) Toggle the encrypt capability
(A) Toggle the authenticate capability
(Q) Finished
Your selection? q
RSA keys may be between 1024 and 4096 bits long.
What keysize do you want? (3072) 4096
Requested keysize is 4096 bits
Please specify how long the key should be valid.
0 = key does not expire
<n> = key expires in n days
<n>w = key expires in n weeks
<n>m = key expires in n months
<n>y = key expires in n years
Key is valid for? (0) 0
Key does not expire at all
Is this correct? (y/N) y
Really create? (y/N) y (输入之前的密码)
We need to generate a lot of random bytes. It is a good idea to perform
some other action (type on the keyboard, move the mouse, utilize the
disks) during the prime generation; this gives the random number
generator a better chance to gain enough entropy.
sec rsa4096/<MASTER_KEY_0>
created: 2019-02-23 expires: never usage: C (主私钥, 编辑副钥用)
trust: ultimate validity: ultimate
ssb rsa4096/<SUB_KEY_1>
created: 2019-02-23 expires: never usage: S (副私钥, 数字签名用)
ssb rsa4096//<SUB_KEY_2>
created: 2019-02-23 expires: never usage: E (副私钥, 加密/解密用)
[ultimate] (1). Bat Guys <email>
gpg> save
------------------------------
$ gpg2 --expert --full-gen-key
gpg (GnuPG) 2.2.4; Copyright (C) 2017 Free Software Foundation, Inc.
This is free software: you are free to change and redistribute it.
There is NO WARRANTY, to the extent permitted by law.
Please select what kind of key you want:
(1) RSA and RSA (default)
(2) DSA and Elgamal
(3) DSA (sign only)
(4) RSA (sign only)
(7) DSA (set your own capabilities)
(8) RSA (set your own capabilities)
(9) ECC and ECC
(10) ECC (sign only)
(11) ECC (set your own capabilities)
(13) Existing key
Your selection? 8
Possible actions for a RSA key: Sign Certify Encrypt Authenticate
Current allowed actions: Sign Certify Encrypt
(S) Toggle the sign capability
(E) Toggle the encrypt capability
(A) Toggle the authenticate capability
(Q) Finished
Your selection? s (关掉 Sign)
Possible actions for a RSA key: Sign Certify Encrypt Authenticate
Current allowed actions: Certify Encrypt
(S) Toggle the sign capability
(E) Toggle the encrypt capability
(A) Toggle the authenticate capability
(Q) Finished
Your selection? e (关掉 Encrypt)
Possible actions for a RSA key: Sign Certify Encrypt Authenticate
Current allowed actions: Certify
(S) Toggle the sign capability
(E) Toggle the encrypt capability
(A) Toggle the authenticate capability
(Q) Finished
Your selection? q
RSA keys may be between 1024 and 4096 bits long.
What keysize do you want? (3072) 4096
Requested keysize is 4096 bits
Please specify how long the key should be valid.
0 = key does not expire
<n> = key expires in n days
<n>w = key expires in n weeks
<n>m = key expires in n months
<n>y = key expires in n years
Key is valid for? (0) 0
Key does not expire at all
Is this correct? (y/N) y
GnuPG needs to construct a user ID to identify your key.
Real name: Bat Guys
Email address: <email>
Comment:
You selected this USER-ID:
"Bat Guys <email>"
Change (N)ame, (C)omment, (E)mail or (O)kay/(Q)uit? o (需要输入一个密码)
We need to generate a lot of random bytes. It is a good idea to perform
some other action (type on the keyboard, move the mouse, utilize the
disks) during the prime generation; this gives the random number
generator a better chance to gain enough entropy.
gpg: key <MASTER_KEY_0> marked as ultimately trusted
gpg: revocation certificate stored as '/home/bat/.gnupg/openpgp-revocs.d/<Master_Key>.rev'
public and secret key created and signed.
pub rsa4096 2019-02-23 [C]
<Master_Key>
uid Bat Guys <email>
2) 添加 2个 subkey (S,E)
---------------------------------
$ gpg2 --expert --edit-key '<email>'
gpg (GnuPG) 2.2.4; Copyright (C) 2017 Free Software Foundation, Inc.
This is free software: you are free to change and redistribute it.
There is NO WARRANTY, to the extent permitted by law.
Secret key is available.
gpg: checking the trustdb
gpg: marginals needed: 3 completes needed: 1 trust model: pgp
gpg: depth: 0 valid: 1 signed: 0 trust: 0-, 0q, 0n, 0m, 0f, 1u
sec rsa4096/<MASTER_KEY_0>
created: 2019-02-23 expires: never usage: C
trust: ultimate validity: ultimate
[ultimate] (1). Bat Guys <email>
2.1) 第1个 Sub Key (S - Sign)
------------------------------
gpg> addkey
Please select what kind of key you want:
(3) DSA (sign only)
(4) RSA (sign only)
(5) Elgamal (encrypt only)
(6) RSA (encrypt only)
(7) DSA (set your own capabilities)
(8) RSA (set your own capabilities)
(10) ECC (sign only)
(11) ECC (set your own capabilities)
(12) ECC (encrypt only)
(13) Existing key
Your selection? 8
Possible actions for a RSA key: Sign Encrypt Authenticate
Current allowed actions: Sign Encrypt
(S) Toggle the sign capability
(E) Toggle the encrypt capability
(A) Toggle the authenticate capability
(Q) Finished
Your selection? e (关掉 Encrypt)
Possible actions for a RSA key: Sign Encrypt Authenticate
Current allowed actions: Sign
(S) Toggle the sign capability
(E) Toggle the encrypt capability
(A) Toggle the authenticate capability
(Q) Finished
Your selection? q
RSA keys may be between 1024 and 4096 bits long.
What keysize do you want? (3072) 4096
Requested keysize is 4096 bits
Please specify how long the key should be valid.
0 = key does not expire
<n> = key expires in n days
<n>w = key expires in n weeks
<n>m = key expires in n months
<n>y = key expires in n years
Key is valid for? (0) 0
Key does not expire at all
Is this correct? (y/N) y
Really create? (y/N) y (输入之前的密码)
We need to generate a lot of random bytes. It is a good idea to perform
some other action (type on the keyboard, move the mouse, utilize the
disks) during the prime generation; this gives the random number
generator a better chance to gain enough entropy.
sec rsa4096/<MASTER_KEY_0>
created: 2019-02-23 expires: never usage: C
trust: ultimate validity: ultimate
ssb rsa4096/<SUB_KEY_1>
created: 2019-02-23 expires: never usage: S
[ultimate] (1). Bat Guys <email>
2.2) 第2个 Sub Key (E - Encrypt)
--------------------------------
gpg> addkey
Please select what kind of key you want:
(3) DSA (sign only)
(4) RSA (sign only)
(5) Elgamal (encrypt only)
(6) RSA (encrypt only)
(7) DSA (set your own capabilities)
(8) RSA (set your own capabilities)
(10) ECC (sign only)
(11) ECC (set your own capabilities)
(12) ECC (encrypt only)
(13) Existing key
Your selection? 8
Possible actions for a RSA key: Sign Encrypt Authenticate
Current allowed actions: Sign Encrypt
(S) Toggle the sign capability
(E) Toggle the encrypt capability
(A) Toggle the authenticate capability
(Q) Finished
Your selection? s (关掉 Sign)
Possible actions for a RSA key: Sign Encrypt Authenticate
Current allowed actions: Encrypt
(S) Toggle the sign capability
(E) Toggle the encrypt capability
(A) Toggle the authenticate capability
(Q) Finished
Your selection? q
RSA keys may be between 1024 and 4096 bits long.
What keysize do you want? (3072) 4096
Requested keysize is 4096 bits
Please specify how long the key should be valid.
0 = key does not expire
<n> = key expires in n days
<n>w = key expires in n weeks
<n>m = key expires in n months
<n>y = key expires in n years
Key is valid for? (0) 0
Key does not expire at all
Is this correct? (y/N) y
Really create? (y/N) y (输入之前的密码)
We need to generate a lot of random bytes. It is a good idea to perform
some other action (type on the keyboard, move the mouse, utilize the
disks) during the prime generation; this gives the random number
generator a better chance to gain enough entropy.
sec rsa4096/<MASTER_KEY_0>
created: 2019-02-23 expires: never usage: C (主私钥, 编辑副钥用)
trust: ultimate validity: ultimate
ssb rsa4096/<SUB_KEY_1>
created: 2019-02-23 expires: never usage: S (副私钥, 数字签名用)
ssb rsa4096//<SUB_KEY_2>
created: 2019-02-23 expires: never usage: E (副私钥, 加密/解密用)
[ultimate] (1). Bat Guys <email>
gpg> save
2019年2月21日星期四
Ubuntu - OpenSnitch 应用防火墙

https://github.com/evilsocket/opensnitch
OpenSnitch 是从 Little Snitch 上移植过来的。
而 Little Snitch 是专门为 Mac OS 设计的一款应用程序防火墙。
OpenSnitch 是由 Simone Margaritelli 设计,也称为 evilsocket。
OpenSnitch 所做的主要事情就是跟踪你机器上安装的应用程序所发起的互联网请求。
OpenSnitch 允许你去创建规则以同意或阻止那个应用程序发起的互联网访问。
当一个应用程序尝试去访问互联网而没有相应的访问规则存在时,
就会出现一个对话框,这个对话框让你去选择允许还是阻止那个连接。
你也可以决定这个新规则是应用到进程上、
具体的 URL 上、域名上、单个实例上,以及本次会话还是永久有效。
1) Go 安装与配置
$ sudo apt-get install golang-go
$ sudo gedit .bashrc
export GOPATH=$HOME/go
export PATH=$PATH:$GOPATH/bin
$ source .bashrc
2) opensnitch 安装
$ sudo apt-get install protobuf-compiler libpcap-dev libnetfilter-queue-dev python3-pip
$ go get github.com/golang/protobuf/protoc-gen-go
$ go get -u github.com/golang/dep/cmd/dep
$ python3 -m pip install --user grpcio-tools
$ go get github.com/evilsocket/opensnitch
$ cd $GOPATH/src/github.com/evilsocket/opensnitch
$ make
$ sudo make install
3) 安装 opensnitch 监控文件, 让 systemd 可管理
$ cd $GOPATH/src/github.com/evilsocket/opensnitch/daemon
$ make
$ sudo make install
4) 安装 opensnitch UI
$ sudo apt-get install python-pyqt5
$ cd $GOPATH/src/github.com/evilsocket/opensnitch/ui
$ sudo pip3 install -r requirements.txt
$ sudo pip3 install .
$ cp opensnitch_ui.desktop ~/.config/autostart/
5) 启动
$ sudo systemctl enable opensnitchd
$ sudo service opensnitchd start
$ opensnitch-ui
2019年2月20日星期三
gydl (youtube-dl GUI)
Python 3 所写,
也是一个以 youtube-dl 为基础的 GUI
https://github.com/JannikHv/gydl
snap
---------
https://snapcraft.io/gydl
$ sudo snap install gydl
flatpak
----------
1) flatpak 安装
https://flatpak.org/setup/Ubuntu/
$ sudo add-apt-repository ppa:alexlarsson/flatpak
$ sudo apt update
$ sudo apt install flatpak
$ sudo apt install gnome-software-plugin-flatpak
$ flatpak remote-add --if-not-exists flathub https://flathub.org/repo/flathub.flatpakrepo
其它 linux 版本, 看 https://flatpak.org/setup/
2) 重启
3) 浏览/安装/运行
https://flathub.org/apps/details/com.github.JannikHv.Gydl
$ flatpak install flathub com.github.JannikHv.Gydl
$ flatpak run com.github.JannikHv.Gydl
2019年2月19日星期二
you-get 视频下载器
这是一个 Python 3 编写的命令行下载器,
可以让你从 Youtube、Facebook、Twitter 等很多热门网站下载图片, 音频和视频.
目前该下载器支持 80+ 站点
https://you-get.org/#supported-sites
https://github.com/soimort/you-get
1) 安装
$ pip3 install you-get
$ pip3 install --upgrade you-get
2) 下载视频
$ you-get https://www.youtube.com/watch?v=bBcp_ljCBGU
找 info, 得到 itag
根据 itag, 可以选择下载不同 quality 视频
$ you-get -i https://www.youtube.com/watch?v=bBcp_ljCBGU
$ you-get --itag=397 https://www.youtube.com/watch?v=bBcp_ljCBGU
3) 搜索视频
$ you-get '童话'
Linux 中 Wondershaper 限制网络带宽
1) 安装
$ git clone https://github.com/magnific0/wondershaper.git
$ cd wondershaper
$ sudo make install
2) 自启
$ sudo systemctl enable wondershaper.service
$ sudo systemctl start wondershaper.service
3) 查询到网卡的详细信息
$ ip addr
$ route
$ ifconfig
4) 限制网络带宽
$ sudo wondershaper -a <adapter> -d <rate> -u <rate>
$ sudo wondershaper -a enp0s8 -d 1024 -u 512
-a:网卡名称
-d:下行带宽(Kbps)
-u:上行带宽(Kbps)
5) 网卡解除网络带宽的限制
$ sudo wondershaper -c -a enp0s8
或
$ sudo wondershaper -c enp0s8
6) 配置文件
$ sudo gedit /etc/conf.d/wondershaper.conf
[wondershaper]
# Adapter
#
IFACE="eth0"
# Download rate in Kbps
#
DSPEED="2048"
# Upload rate in Kbps
#
USPEED="512"
2019年2月18日星期一
Ubuntu - OneDrive (rclone 挂载)
1) rclone 安装
https://rclone.org/downloads/
$ wget https://downloads.rclone.org/v1.46/rclone-v1.46-linux-amd64.deb
$ sudo apt install libfuse2 rclone-browser
$ sudo dpkg -i rclone-v1.46-linux-amd64.deb
2) 让软件得到权限处理 OneDrive 文件 (取得 access_token)
$ rclone authorize "onedrive"
$ rclone authorize "box"
$ rclone authorize "yandex"
$ rclone authorize "dropbox"
# google drive 不需要, 直接可跑 rclone config
2019/02/18 02:15:53 NOTICE: Config file "/home/username/.config/rclone/rclone.conf" not found - using defaults
If your browser doesn't open automatically go to the following link: http://127.0.0.1:53682/auth
Log in and authorize rclone for access
Waiting for code...
Got code
Paste the following into your remote machine --->
{"access_token":"","expiry":"2019-02-18T03:16:12.502116809+08:00"}
<---End paste
3) rclone 配置 (new remote_name: bat)(OneDrive)
$ rclone config
No remotes found - make a new one
n) New remote
s) Set configuration password
q) Quit config
n/s/q> n
name> bat (之后可以改名)
Type of storage to configure.
Enter a string value. Press Enter for the default ("").
Choose a number from below, or type in your own value
1 / A stackable unification remote, which can appear to merge the contents of several remotes
\ "union"
2 / Alias for a existing remote
\ "alias"
3 / Amazon Drive
\ "amazon cloud drive"
4 / Amazon S3 Compliant Storage Provider (AWS, Alibaba, Ceph, Digital Ocean, Dreamhost, IBM COS, Minio, etc)
\ "s3"
5 / Backblaze B2
\ "b2"
6 / Box
\ "box"
7 / Cache a remote
\ "cache"
8 / Dropbox
\ "dropbox"
9 / Encrypt/Decrypt a remote
\ "crypt"
10 / FTP Connection
\ "ftp"
11 / Google Cloud Storage (this is not Google Drive)
\ "google cloud storage"
12 / Google Drive
\ "drive"
13 / Hubic
\ "hubic"
14 / JottaCloud
\ "jottacloud"
15 / Local Disk
\ "local"
16 / Mega
\ "mega"
17 / Microsoft Azure Blob Storage
\ "azureblob"
18 / Microsoft OneDrive
\ "onedrive"
19 / OpenDrive
\ "opendrive"
20 / Openstack Swift (Rackspace Cloud Files, Memset Memstore, OVH)
\ "swift"
21 / Pcloud
\ "pcloud"
22 / QingCloud Object Storage
\ "qingstor"
23 / SSH/SFTP Connection
\ "sftp"
24 / Webdav
\ "webdav"
25 / Yandex Disk
\ "yandex"
26 / http Connection
\ "http"
Storage> 18
** See help for onedrive backend at: https://rclone.org/onedrive/ **
Microsoft App Client Id
Leave blank normally.
Enter a string value. Press Enter for the default ("").
client_id> 空
Microsoft App Client Secret
Leave blank normally.
Enter a string value. Press Enter for the default ("").
client_secret> 空
Edit advanced config? (y/n)
y) Yes
n) No
y/n> y
Chunk size to upload files with - must be multiple of 320k.
Above this size files will be chunked - must be multiple of 320k. Note
that the chunks will be buffered into memory.
Enter a size with suffix k,M,G,T. Press Enter for the default ("10M").
chunk_size> 空
The ID of the drive to use
Enter a string value. Press Enter for the default ("").
drive_id> 空
The type of the drive ( personal | business | documentLibrary )
Enter a string value. Press Enter for the default ("").
drive_type> 空
Set to make OneNote files show up in directory listings.
By default rclone will hide OneNote files in directory listings because
operations like "Open" and "Update" won't work on them. But this
behaviour may also prevent you from deleting them. If you want to
delete OneNote files or otherwise want them to show up in directory
listing, set this option.
Enter a boolean value (true or false). Press Enter for the default ("false").
expose_onenote_files>
Remote config
Use auto config?
* Say Y if not sure
* Say N if you are working on a remote or headless machine
y) Yes
n) No
y/n> n (如果是 Google Drive, 选 y)
For this to work, you will need rclone available on a machine that has a web browser available.
Execute the following on your machine:
rclone authorize "onedrive"
Then paste the result below:
result> {"access_token":"","expiry":"2019-02-18T03:16:12.502116809+08:00"}
Choose a number from below, or type in an existing value
1 / OneDrive Personal or Business
\ "onedrive"
2 / Root Sharepoint site
\ "sharepoint"
3 / Type in driveID
\ "driveid"
4 / Type in SiteID
\ "siteid"
5 / Search a Sharepoint site
\ "search"
Your choice> 1
Found 1 drives, please select the one you want to use:
0: (personal) id=abc123567890
Chose drive to use:> 0
Found drive 'root' of type 'personal', URL: https://onedrive.live.com/?cid=abc123567890
Is that okay?
y) Yes
n) No
y/n> y
--------------------
[bat]
type = onedrive
token = {"access_token":"","expiry":"2019-02-18T03:16:12.502116809+08:00"}
drive_id = abc123567890
drive_type = personal
--------------------
y) Yes this is OK
e) Edit this remote
d) Delete this remote
y/e/d> y
Current remotes:
Name Type
==== ====
bat onedrive
e) Edit existing remote
n) New remote
d) Delete remote
r) Rename remote
c) Copy remote
s) Set configuration password
q) Quit config
e/n/d/r/c/s/q> q
4) fuse 配置 (拿掉以下前面的 # 符号)
$ sudo gedit /etc/fuse.conf
user_allow_other
5) 挂载
$ mkdir -p /home/username/My_OneDrive
$ rclone mount bat:/ /home/username/My_OneDrive
--copy-links --no-gzip-encoding --no-check-certificate --allow-other --allow-non-empty --umask 000
6) 卸载
$ fusermount -qzu /home/username/My_OneDrive
7) 自启 Startup Applications
将步骤5挂载命令加入到 Startup Application 即可
2019年2月17日星期日
OpenDrive (Google Drive 客户端)
OpenDrive (非官方软件)
https://electronjs.org/apps/odrive
https://github.com/liberodark/ODrive
https://snapcraft.io/odrive-unofficial
也是 Google Drive 客户端软件,
只不过它是 Electron App.
支持 Linux / Mac / Windows.
snap 安装
------------
$ sudo snap install odrive-unofficial
deb 安装
------------
$ wget https://github.com/liberodark/ODrive/releases/download/0.2.0/odrive_0.2.0_amd64.deb
$ sudo dpkg -i odrive_0.2.0_amd64.deb
$ sudo apt --fix-broken install
Ubuntu 挂载 Google Drive (google-drive-ocamlfuse)
----------------------------------------------------------
google-drive-ocamlfuse
https://github.com/astrada/google-drive-ocamlfuse
https://launchpad.net/~alessandro-strada/+archive/ubuntu/ppa
----------------------------------------------------------
1) 安装 google-drive-ocamlfuse
$ sudo add-apt-repository ppa:alessandro-strada/ppa
$ sudo apt-get update
$ sudo apt-get install google-drive-ocamlfuse
2) 先创建一个名叫 Google_Drive 的文件夹(挂载点)
$ mkdir ~/Google_Drive
3) 利用软件 google-drive-ocamlfuse 创建一个标签,
而这个标签会连接到以上文件夹
$ google-drive-ocamlfuse -label My_Google_Drive ~/Google_Drive
第一次, 会打开浏览器进入 Google 户口里,
要给这软件权限处理 Google Drive 中的文件.
完成后, 会出现 Access token retrieved correctly.
之后,
Files 文件浏览器的左边框会出现 My_Google_Drive,
点击进去(等于挂载)就可以进入自己户口的 Google Drive.
挂载后, ~/Google_Drive 就会有文件列表了.
(除非主动去处理文件, 否则不会自动下载文件)
4) 可以在 Startup Applications 加入
Name: Google_Drive
Command: /usr/bin/google-drive-ocamlfuse -label My_Google_Drive /home/username/Google_Drive
Comment: 进入 GNOME 后, 自动挂载 Google Drive
* 记得改以上 /home/username 为正确路径
5) 卸载 (Unmount)
$ fusermount -u ~/Google_Drive
订阅:
博文 (Atom)