1. 安装
$ su
Ubuntu
$ apt install vsftpd
Fedora
$ dnf install vsftpd
CentOS
$ yum install vsftpd
OpenSUSE
$ zypper install vsftpd
2. 设置
$ gedit /etc/vsftpd.conf
# 禁止匿名访问
anonymous_enable=NO
# 接受本地用户
local_enable=YES
# 允许上传
write_enable=YES
pam_service_name=vsftpd
# 用户只能访问限制的目录
chroot_local_user=YES
# 如果客户端登录时候提示 "以pasv模式连接失败"
pasv_promiscuous=YES
# 设置目录 (如果不添加这一行, 各用户对应自己的目录)
local_root=/home/client
$ gedit /etc/pam.d/vsftpd
auth required pam_shells.so
3. 准备 SSL 证书
http://jasonmun.blogspot.my/2017/02/openssl-ca-ssl.html
4. SSL 设置
$ gedit /etc/vsftpd.conf
ssl_enable=YES
ssl_tlsv1=YES
ssl_sslv2=NO
ssl_sslv3=NO
rsa_cert_file=/etc/pki/server-cert.pem
rsa_private_key_file=/etc/pki/server-key.pem
allow_anon_ssl=NO
force_local_data_ssl=YES
force_local_logins_ssl=YES
require_ssl_reuse=NO
# 打开端口范围 40000 - 50000
pasv_min_port=40000
pasv_max_port=50000
# 测试用
debug_ssl=YES
5. 开启
$ systemctl restart vsftpd
6. 准备 FTP 户口
$ useradd -s /bin/bash -d /home/client -m client
$ passwd client
7. 用 FTP 客户端连接以上服务
有了主机 IP, Port, 用户名与密码就可以了
WinSCP
https://winscp.net/eng/download.php
BitKinex
http://www.bitkinex.com/
FileZilla 客户端
http://jasonmun.blogspot.my/2016/12/linux-filezilla.html
8. 撤除户口
$ userdel -r client
2016年12月31日星期六
Linux - Firewall
$ su
Ubuntu
$ systemctl stop ufw
$ systemctl disable ufw
$ systemctl status ufw
$ systemctl enable ufw
$ systemctl start ufw
http://jasonmun.blogspot.my/2016/12/ubuntu-firewall.html
Fedora / CentOS
$ systemctl stop firewalld
$ systemctl disable firewalld
$ systemctl status firewalld
$ systemctl enable firewalld
$ systemctl start firewalld
$ firewall-cmd --get-active-zones
$ firewall-cmd --add-port={110/tcp,143/tcp} --permanent --zone=FedoraWorkstation
$ firewall-cmd --add-service=telnet --permanent --zone=FedoraWorkstation
$ firewall-cmd --reload
$ firewall-cmd --list-all --zone=FedoraWorkstation
OpenSUSE
$ systemctl stop SuSEfirewall2
$ systemctl disable SuSEfirewall2
$ systemctl status SuSEfirewall2
$ systemctl enable SuSEfirewall2
$ systemctl start SuSEfirewall2
http://jasonmun.blogspot.my/2017/01/opensuse-firewall.html
Linux - NFS 服务
1. 安装
$ su
Ubuntu
$ apt install nfs-kernel-server rpcbind nfs-common
Fedora
$ dnf install nfs-utils rpcbind
CentOS
$ yum install nfs-utils rpcbind
OpenSUSE
$ zypper install nfs-kernel-server rpcbind nfs-client
2. 准备一个 Shared Folder
$ cd /home/username
$ mkdir Share
$ chmod 777 Share
3. 设置
$ gedit /etc/exports
/home/username/Share *(rw,sync,no_subtree_check,no_root_squash)
$ exportfs -a
4. 开启
$ systemctl start rpcbind nfs-server
5. 用 NFS 客户端连接以上服务
Linux
$ su
客户端需要安装 nfs-common (Ubuntu), nfs-utils (Fedora / CentOS), nfs-client (OpenSUSE)
$ showmount -e SERVER_IP
$ mkdir -p /home/client/Store
$ mount -t nfs SERVER_IP:/home/username/Share /home/client/Store -o proto=tcp -o nolock
$ ls /home/client/Store
$ umount /home/client/Store
确认连接没问题的话, 可以写入 /etc/fstab ..
$ gedit /etc/fstab
SERVER_IP:/home/username/Share /home/client/Store nfs ro,hard,intr 0 0
Windows
https://sourceforge.net/projects/nfsclient/files/
$ su
Ubuntu
$ apt install nfs-kernel-server rpcbind nfs-common
Fedora
$ dnf install nfs-utils rpcbind
CentOS
$ yum install nfs-utils rpcbind
OpenSUSE
$ zypper install nfs-kernel-server rpcbind nfs-client
2. 准备一个 Shared Folder
$ cd /home/username
$ mkdir Share
$ chmod 777 Share
3. 设置
$ gedit /etc/exports
/home/username/Share *(rw,sync,no_subtree_check,no_root_squash)
$ exportfs -a
4. 开启
$ systemctl start rpcbind nfs-server
5. 用 NFS 客户端连接以上服务
Linux
$ su
客户端需要安装 nfs-common (Ubuntu), nfs-utils (Fedora / CentOS), nfs-client (OpenSUSE)
$ showmount -e SERVER_IP
$ mkdir -p /home/client/Store
$ mount -t nfs SERVER_IP:/home/username/Share /home/client/Store -o proto=tcp -o nolock
$ ls /home/client/Store
$ umount /home/client/Store
确认连接没问题的话, 可以写入 /etc/fstab ..
$ gedit /etc/fstab
SERVER_IP:/home/username/Share /home/client/Store nfs ro,hard,intr 0 0
Windows
https://sourceforge.net/projects/nfsclient/files/
2016年12月29日星期四
VMware + VirtualBox - Network Adapter - Bridged

安装 VirtualBox 后,
VMware 会自动选择用 VirtualBox 所选的虚拟网卡,
导致 Bridged Adapter 不能用
解决方法
VMware - Edit - Virtual Network Editor - Bridged to : Automatic
- 改选用主机的物理网卡如 Intel(R) Centrino(R) Wireless-N 2230
- apply
VirtualBox - 用 2个 Network Adapters
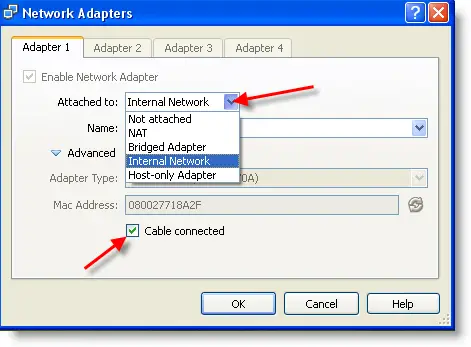
Network - Adapter 1 - Enable Network Adapter - NAT ( 10.0.2.15 )
Network - Adapter 2 - Enable Network Adapter - Host-only Adapter ( 192.168.56.* )
VirtualBox 需要用安装版, 因安装版才能用 Host-only Adapter
Control Panel - Network and Internet - Network Connections - VirtualBox Host-Only Network
VirtualBox - File - Preferences - Network - Host-only Networks - VirtualBox Host-Only Ethernet Adapter
以上设置用 2个 Network Adapter
在 Linux 用 ifconfig 或 Windows 用 ipconfig 检查 IP,
应该自动会有 2个 ethernet network adapter (eth0 / eth1) 的 IP
NAT 不能在主机上 ping 虚拟机, 能上网
Host-only Adapter 的 IP 能在主机上 ping 虚拟机, 但不能上网
不是所有的 Linux 分布版本都是自动设置的, 如以下
OpenSUSE
在 YaST 输入 Network Settings 设置 eth1
2016年12月28日星期三
Linux - Samba 服务 / 客户端
Samba 服务需要打开防火壁端口 139 和 445
Ubuntu
Ubuntu
# Samba 服务与客户端安装
$ sudo apt-get install samba smbclient
# Samba 管理界面
$ sudo apt-get install system-config-samba
# 需要这个文件, 否则 Samba 管理界面无法运行
$ sudo touch /etc/libuser.conf
# 运行$ sudo system-config-samba
Fedora
$ sudo dnf install samba samba-client
$ wget ftp://ftp.pbone.net/mirror/ftp5.gwdg.de/pub/opensuse/repositories/home:/Kenzy:/modified:/C7/CentOS_7/noarch/system-config-samba-1.2.100-2.1.noarch.rpm
$ wget ftp://ftp.pbone.net/mirror/ftp5.gwdg.de/pub/opensuse/repositories/home:/Kenzy:/modified:/C7/CentOS_7/noarch/system-config-samba-docs-1.0.9-2.1.noarch.rpm
$ sudo dnf install system-config-samba-docs-1.0.9-2.1.noarch.rpm system-config-samba-1.2.100-2.1.noarch.rpm --allowerasing
$ sudo setsebool -P samba_enable_home_dirs 1
CentOS
$ sudo yum install samba samba-client
$ wget ftp://ftp.pbone.net/mirror/ftp5.gwdg.de/pub/opensuse/repositories/home:/Kenzy:/modified:/C7/CentOS_7/noarch/system-config-samba-1.2.100-2.1.noarch.rpm
$ wget ftp://ftp.pbone.net/mirror/ftp5.gwdg.de/pub/opensuse/repositories/home:/Kenzy:/modified:/C7/CentOS_7/noarch/system-config-samba-docs-1.0.9-2.1.noarch.rpm
$ sudo yum install system-config-samba-docs-1.0.9-2.1.noarch.rpm system-config-samba-1.2.100-2.1.noarch.rpm
$ sudo setsebool -P samba_enable_home_dirs 1
OpenSUSE
$ sudo zypper install samba samba-client
去 YaST 找 Samba Server 可以设置..
# Samba 服务开启 (start / stop / restart / status)
$ sudo service smb status
$ sudo service smb restart
或
$ sudo systemctl status smbd
$ sudo systemctl restart smbd
# 设置 Samba 用户密码
$ sudo smbpasswd -a username
# 列出所有 Shared Folders
$ smbclient -L 192.168.0.1 -U username
$ smbclient -c "ls" //192.168.0.1/Share -U username
$ smbclient -c "mkdir Share" //192.168.0.1/Share -U username
或
$ smbclient //192.168.0.1/Share -U username
$ smb:/>ls
$ smb:/>cd Share
$ smb:/>exit
$ smbclient -c "ls" //192.168.0.1/Share -U username
$ smbclient -c "mkdir Share" //192.168.0.1/Share -U username
或
$ smbclient //192.168.0.1/Share -U username
$ smb:/>ls
$ smb:/>cd Share
$ smb:/>exit
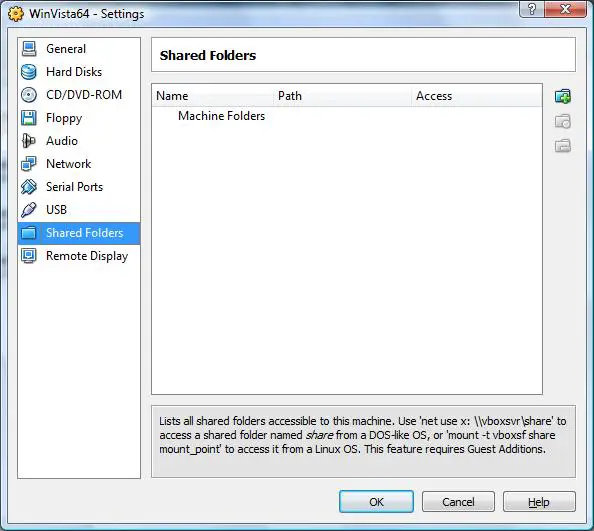
Linux / Windows - Shared Folders

1. 如图, 设置至少一个 Shared Folders
2. Windows 与 Linux 间的连接
- 在 Windows 连接 (在 run 处输入以下)
\\192.168.0.1\Share- 在 Linux 连接 (在 Files - Other Locations - Connect to Server 处输入以下)
smb://192.168.0.1/Share
Linux - Samba 服务 / 客户端
http://jasonmun.blogspot.my/2016/12/linux-samba.html
2016年12月27日星期二
ubuntu - VNC 服务 - vino
新版的 ubuntu 已安装了 vino (一款 vncserver),
但无法用 vnc client 连接, 会出现 Server did not offer supported security type 的问题
* 已在 ubuntu 16.10 通过测试
解决方法
1. 先去 Desktop Sharing 设置 vino server (如图)
$ vino-preferences
2. 弄个 vino.sh
https://raw.githubusercontent.com/yomun/store/master/sh/vino.sh
$ gedit ~/vino.sh
#!/bin/bash
# 先启动
/usr/lib/vino/vino-server --sm-disable
# 设置
export DISPLAY=0:0
gsettings set org.gnome.Vino require-encryption false
3. 给与 vino.sh 执行权限
$ chmod +x vino.sh
4. 去 Startup Applications
让系统开机运行 vino.sh
5. 重启后, 下载一款 vnc viewer 连接以上服务
https://www.realvnc.com/download/viewer/
2016年12月25日星期日
VirtualBox - Linux - Shared Folders - Permission Denied

在 Virtual Box 设置 Shared Folders 后, 会出现 permission denied 的问题,
因要 root 户口才能进入 shared folders 里
解决这个问题, 还有一个方法
就是将自己在用的户口加入到 vboxsf 组
$ sudo adduser username vboxsf
或
$ sudo usermod -aG vboxsf username
Solus 还要运行..
$ sudo chmod -R 755 /media
重启..
不要的话, 从 vboxsf 组里撤户口
$ groups username
$ sudo gpasswd -d username vboxsf
2016年12月22日星期四
Linux - TeamViewer
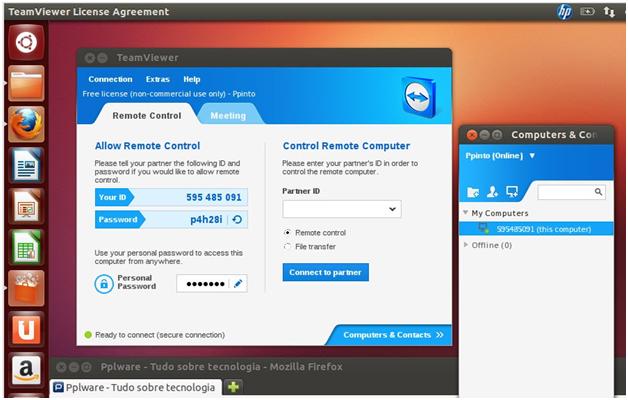
TeamViewer
https://www.teamviewer.com/zhcn/download/linux/
可以拿来取代 VNC 的软件
只要知道对方的 teamviewer ID 和密码 ( 可以设置成固定密码 ),
就可以在自己的 teamviewer 中连接对方
$ cd ~/Downloads
$ su
Ubuntu / Debian / Linux Mint
https://download.teamviewer.com/download/teamviewer_i386.deb
$ dpkg -i teamviewer_12.0.71510_i386.deb
$ apt-get install -f
$ teamviewer
CentOS / Fedora / SUSE
https://download.teamviewer.com/download/teamviewer.i686.rpm
# CentOS 7
$ yum install teamviewer_12.0.71510.i686.rpm
# Fedora 25 ( Log Out 后再 Log In 到 GNOME on Xorg, 不然 teamviewer 无法连接 )
$ dnf install teamviewer_12.0.71510.i686.rpm
# OpenSUSE 42.2
$ zypper install teamviewer_12.0.71510.i686.rpm
Linux - ASP.NET - mono 编辑器
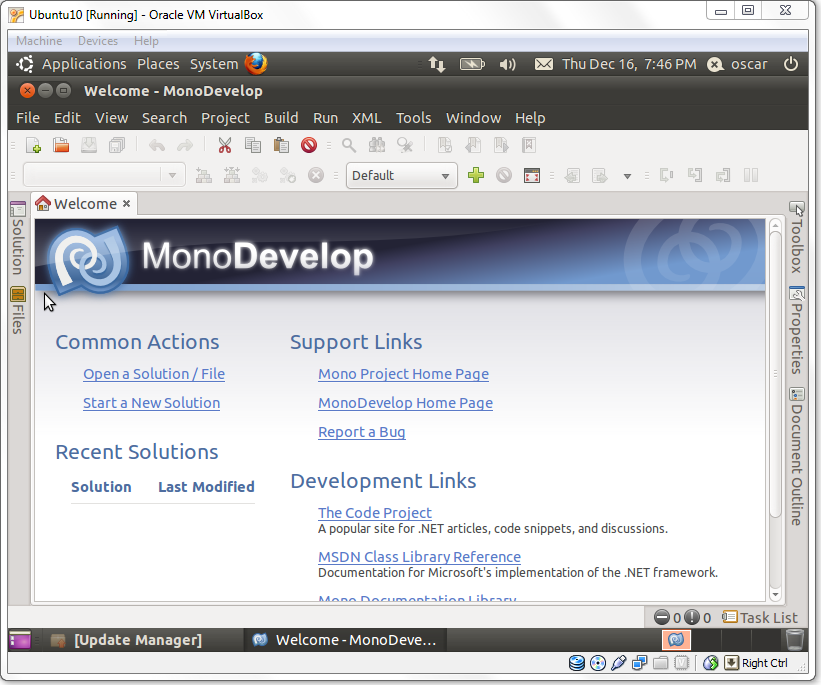
Ubuntu / Linux Mint / Debian
$ apt-get install monodevelop
Fedora
$ dnf install monodevelop
OpenSUSE
https://software.opensuse.org/package/monodevelop
CentOS
$ yum install monodevelop
Linux - ASP.NET 服务
http://jasonmun.blogspot.my/2016/12/linux-aspnet.html
2016年12月19日星期一
CentOS - ASP.NET 服务
http://www.mono-project.com/docs/getting-started/install/linux/#centos-7-fedora-19-and-later-and-derivatives
$ su
$ yum install yum-utils
$ rpm --import "http://keyserver.ubuntu.com/pks/lookup?op=get&search=0x3FA7E0328081BFF6A14DA29AA6A19B38D3D831EF"
$ yum-config-manager --add-repo http://download.mono-project.com/repo/centos/
$ yum install mono-core
2.测试 Mono
$ mono -V
3.安装 XSP + Apache2
$ yum install xsp
# 如果不想直接用 XSP, 可多安装 Apache2
$ yum install httpd apache2-mod_mono
4. 为 XSP 准备一个文件夹做根目录 DocumentRoot
$ su username
$ cd /home/username
$ mkdir www
5. 运行 XSP 或 Apache2
$ su root
$ cd /home/username/www
$ xsp4 --port=80
$ cd /home/username/www
$ xsp4 --port=80
或
$ systemctl restart httpd
6. 测试
# 用 XSP 的话
$ su username
$ cd /home/username/www
$ systemctl restart httpd
6. 测试
# 用 XSP 的话
$ su username
$ cd /home/username/www
或
# 用 Apache2 的话
$ su root
$ cd /var/www/html
# 用 Apache2 的话
$ su root
$ cd /var/www/html
$ gedit index.aspx
<%@ Page Language="C#" %>
<html>
<head>
<title>hello world</title>
</head>
<body>
<%
for (int i=1; i<=7; i++)
{
Response.Write("<font size=" + i.ToString() + ">");
Response.Write("hello world");
Response.Write("</font><br />");
}
%>
</body>
</html>
<%@ Page Language="C#" %>
<html>
<head>
<title>hello world</title>
</head>
<body>
<%
for (int i=1; i<=7; i++)
{
Response.Write("<font size=" + i.ToString() + ">");
Response.Write("hello world");
Response.Write("</font><br />");
}
%>
</body>
</html>
$ wget http://localhost/index.aspx
7. Service Unavailable (503)
# 在 /etc/httpd/logs/error_log 出现
# Cannot open assembly '/usr/lib/mono/2.0/mod-mono-server2.exe': No such file or directory.
解决方法
$ su
$ gedit /etc/httpd/conf/httpd.conf
MonoServerPath /usr/bin/mod-mono-server4
IncludeOptional conf.d/*.conf
$ gedit /etc/sysconfig/selinux
SELINUX=disabled
$ systemctl restart httpd
Linux - ASP.NET 服务
1. 安装 Mono + XSP + Apache2 (Apache2 可选择不安装)
$ su
Ubuntu / Linux Mint / Debian
$ apt-get install mono-xsp4
$ apt-get install apache2 libapache2-mod-mono
Fedora
$ dnf install xsp
$ dnf install httpd mod_mono
OpenSUSE
$ zypper install xsp
$ zypper install apache2 apache2-mod_mono
CentOS
http://jasonmun.blogspot.my/2016/12/centos-aspnet.html
2. 测试 Mono
$ mono -V
3. 为 XSP 准备一个文件夹做根目录 DocumentRoot
$ su username
$ cd /home/username
$ mkdir www
4. 运行 XSP 或 Apache2
$ su
$ cd /home/username/www
$ xsp4 --port=80
或
# Fedora / CentOS
$ systemctl restart httpd
# 其它 Linux 版本
$ systemctl restart apache2
5. 测试
# 用 XSP 的话
$ su username
$ cd /home/username/www
或
# 用 Apache2 的话
$ su
# OpenSUSE - Apache2
$ cd /srv/www/htdocs
# 其它 Linux 版本 - Apache2
$ cd /var/www/html
$ gedit index.aspx
<%="Hello Mono in Linux"%>
$ wget http://localhost/index.aspx
6. 有关 Fedora 里的 Service Unavailable (503) 问题
http://jasonmun.blogspot.my/2016/12/centos-aspnet.html
7. monodevelop 编辑器
http://jasonmun.blogspot.my/2016/12/linux-aspnet-monodevelop.html
Linux - FileZilla 客户端
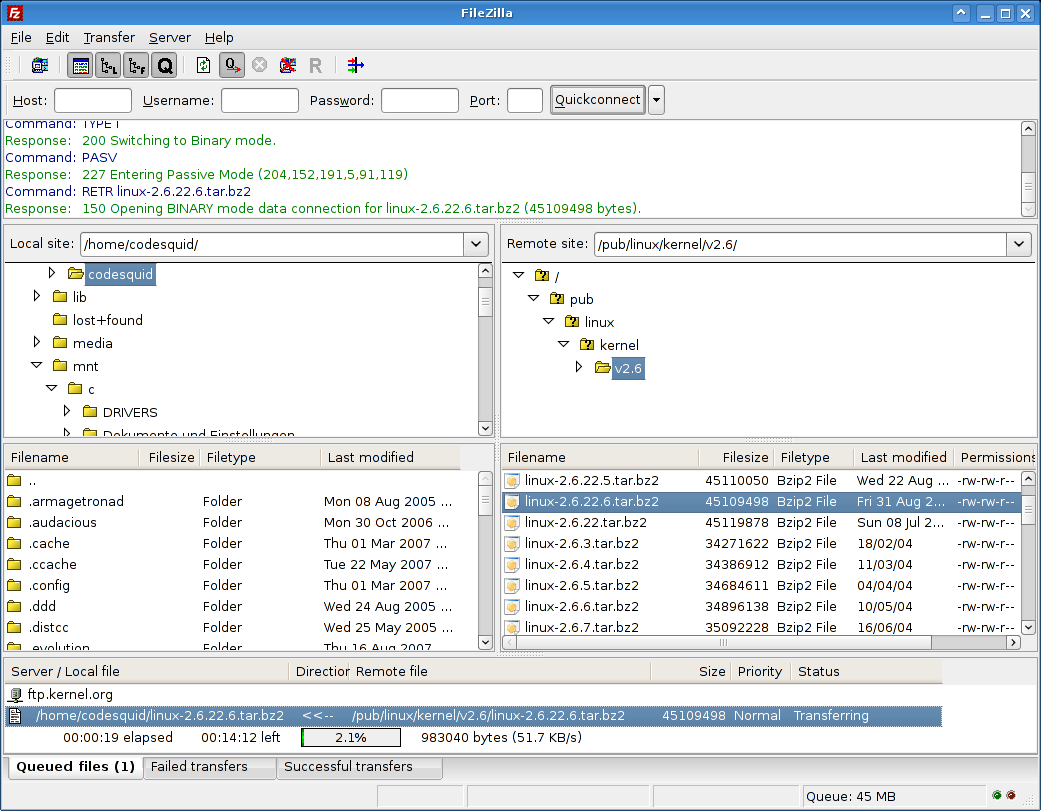
FileZilla ( FTP / SFTP 客户端 )
https://filezilla-project.org/download.php?show_all=1
多数的 Linux 都会提供 FileZilla 客户端下载, 如
[Ubuntu] sudo apt-get install filezilla
[Fedora] sudo dnf install filezilla
[OpenSUSE] sudo zypper install FileZilla
不过还有另外的选择就是到官网下载
http://sourceforge.net/projects/filezilla/files/FileZilla_Client/3.23.0.2/FileZilla_3.23.0.2_x86_64-linux-gnu.tar.bz2/download
http://sourceforge.net/projects/filezilla/files/FileZilla_Client/3.23.0.2/FileZilla_3.23.0.2_x86_64-linux-gnu.tar.bz2/download
$ bzip2 -d FileZilla_3.23.0.2_x86_64-linux-gnu.tar.bz2
$ tar -xvf FileZilla_3.23.0.2_x86_64-linux-gnu.tar
$ FileZilla3/bin/filezilla
2016年12月18日星期日
XAMPP - FileZilla 服务
开启服务
按 Admin, 准备连接进入服务器

2. 连接进入 FileZilla Server 后
在菜单选 Edit - Users
准备 FTP 户口
a) General - Add - Account settings - Enable account / Password
b) Shared folders - Add


3. 用 FTP 客户端连接以上服务
有了主机 IP, Port, 用户名与密码就可以了
WinSCP
https://winscp.net/eng/download.php
BitKinex
http://www.bitkinex.com/
Linux - XAMPP - ProFTPd 服务
$ su
1. 设置
$ gedit /opt/lampp/etc/proftpd.conf
Port 21
DefaultRoot /home/%u/public_ftp
UseReverseDNS off
IdentLookups off
重启..
2. 创建 ftp 用户组
$ groupadd ftpusers
3. 创建用户 jason 加入用户组 ftpusers
$ useradd -s /bin/bash -d /home/jason -g ftpusers -m jason
$ passwd jason
$ cd /home/jason
$ mkdir public_ftp
$ chmod -R 777 public_ftp
4. 用 FTP 客户端连接以上服务
有了主机 IP, Port, 用户名与密码就可以了
WinSCP
https://winscp.net/eng/download.php
BitKinex
http://www.bitkinex.com/
FileZilla 客户端
http://jasonmun.blogspot.my/2016/12/linux-filezilla.html
5. 撤除用户组与用户
$ userdel -r jason
$ groupdel ftpusers
ubuntu - Firewall

Ubuntu 里面已安装了 ufw, 但 disable 掉了
所以如果要用 ufw, 建议安装上界面 gufw,
用起来简单又方便
$ sudo apt-get install gufw
如果不要安装以上界面, 那就要学以下命令
# 启动
$ sudo ufw enable
# 允许 SSH 端口
$ sudo ufw allow 22
$ sudo ufw allow 22/tcp
$ sudo ufw allow ssh
# 阻挡 SSH
$ sudo ufw reject out ssh
# 查看状态
$ sudo ufw status
# 停止拒绝 SSH
$ sudo ufw delete reject out ssh
# 否决来自 192.168.0.1 到 22 端口的数据
$ sudo ufw deny proto tcp from 192.168.0.1 to any port 22
# 重设定
$ sudo ufw reset
$ sudo ufw app list
$ sudo ufw app info application_name
$ sudo ufw allow application_name
# 启动记录
$ sudo ufw logging on
IIS - PHP 设置

1. 安装 Microsoft Visual C++ 2015 运行库
要最新版, 不然 PHP 可能无法运行
https://www.microsoft.com/en-us/download/details.aspx?id=53840
http://www.downxia.com/downinfo/29834.html
2. 在 Control Panel - Programs and Features - Windows features 设置
Internet Information Services
------> Web Management Tools
--------->> IIS Management Console
------> World Wide Web Services
--------->> Application Development Features
------------>>> CGI
3. PHP (解压放到 C:\php)
http://windows.php.net/downloads/
http://windows.php.net/downloads/releases/php-7.1.0-nts-Win32-VC14-x64.zip
4. PHP Manager 安装与设置
https://phpmanager.codeplex.com/releases/view/69115
https://phpmanager.codeplex.com/downloads/get/253209
安装后 IIS 里会出现 PHP Manager
进入 Register new PHP version
选择
C:\php\php-cgi.exe
然后按 Check phpinfo() 检查是否安装成功
可以到以下增加 PHP 模块
PHP Extensions - Add an extension
订阅:
博文 (Atom)