广告

本站里的文章大部分经过自行整理与测试

2017年1月31日星期二

Linux - OpenLDAP 客户端

OpenLDAP 服务
http://jasonmun.blogspot.my/2017/01/linux-openldap.html

1. 设置

$ gedit /etc/openldap/ldap.conf

BASE dc=dlinkddns,dc=com
BINDDN cn=Manager,dc=dlinkddns,dc=com

URI ldaps://member.dlinkddns.com:636

TLS_REQCERT never

TLS_CIPHER_SUITE ALL:!TLSv1.1:TLSv1.2:!SSLv2:!aNULL:!eNULL:!MD5:!MEDIUM:!LOW

TLS_CACERTDIR /etc/letsencrypt/live/member.dlinkddns.com

ldap_version 3

# Turning this off breaks GSSAPI used with krb5 when rdns = false
SASL_NOCANON on

2. 应用

搜索

ldapsearch -H ldap://member.dlinkddns.com -x -b "ou=People,dc=dlinkddns,dc=com"
$ ldapsearch -H ldaps://member.dlinkddns.com -x -b "ou=People,dc=dlinkddns,dc=com"

$ ldapsearch -H ldap://member.dlinkddns.com -D "cn=Manager,dc=dlinkddns,dc=com" -w 123 -x -b "ou=People,dc=dlinkddns,dc=com"
$ ldapsearch -H ldaps://member.dlinkddns.com -D "cn=Manager,dc=dlinkddns,dc=com" -w 123 -x -b "ou=People,dc=dlinkddns,dc=com"

导入数据
$ ldapadd -xWD "cn=Manager,dc=dlinkddns,dc=com" -f demo.ldif

撤除
$ ldapdelete -x -D 'cn=Manager,dc=dlinkddns,dc=com' -w 123 'uid=jlive,dc=dlinkddns,dc=com'

修改密码
$ ldappasswd -x -D 'cn=Manager,dc=dlinkddns,dc=com' -W 'uid=jlive,dc=dlinkddns,dc=com' -S

身份确认
$ ldapwhoami -x -D 'cn=Manager,dc=dlinkddns,dc=com' -w 123

更改
$ gedit modify.ldif

dn: uid=jlive,dc=dlinkddns,dc=com
changetype: modify
replace: sn
sn: liu

$ ldapmodify -x -D 'cn=Manager,dc=dlinkddns,dc=com' -w 123 -f modify.ldif

2017年1月30日星期一

Linux - OpenLDAP 服务


$ su

1. 安装

Ubuntu
http://jasonmun.blogspot.my/2017/02/ubuntu-openldap.html

CentOS
$ yum install openldap-servers openldap-clients

Fedora
$ dnf install openldap-servers openldap-clients

2. 准备

$ cp /usr/share/openldap-servers/DB_CONFIG.example /var/lib/ldap/DB_CONFIG

$ slappasswd -h {MD5} -s 123

$ chown -R ldap:ldap /etc/openldap/slapd.d
$ chown -R ldap:ldap /var/lib/ldap
$ chmod 777 /var/lib/ldap
$ chmod 777 /var/lib/ldap/*

生成 SSL 证书
http://jasonmun.blogspot.my/2017/01/lets-encrypt-lighttpd-https.html

3. 设置

3.1) 创建 slapd.conf

$ gedit /etc/openldap/slapd.conf

include /etc/openldap/schema/core.schema
include /etc/openldap/schema/collective.schema
include /etc/openldap/schema/corba.schema
include /etc/openldap/schema/cosine.schema
include /etc/openldap/schema/duaconf.schema
include /etc/openldap/schema/dyngroup.schema
include /etc/openldap/schema/inetorgperson.schema
include /etc/openldap/schema/java.schema
include /etc/openldap/schema/misc.schema
include /etc/openldap/schema/nis.schema
include /etc/openldap/schema/openldap.schema
include /etc/openldap/schema/ppolicy.schema
include /etc/openldap/schema/pmi.schema

pidfile /var/run/openldap/slapd.pid
argsfile /var/run/openldap/slapd.args

loglevel 256
logfile  /var/log/slapd.log

database mdb
maxsize 1073741824

suffix "dc=dlinkddns,dc=com"
rootdn "cn=Manager,dc=dlinkddns,dc=com"
rootpw {MD5}ICy5YqxZB1uWSwcVLSNLcA==

directory /var/lib/ldap
index objectClass eq

# TLSCipherSuite DEFAULT
TLSCipherSuite ALL:!TLSv1.1:TLSv1.2:!SSLv2:!aNULL:!eNULL:!MD5:!MEDIUM:!LOW

TLSCertificateFile        /etc/letsencrypt/live/member.dlinkddns.com/cert.pem
TLSCertificateKeyFile /etc/letsencrypt/live/member.dlinkddns.com/privkey.pem
TLSCACertificateFile  /etc/letsencrypt/live/member.dlinkddns.com/fullchain.pem

# never / allow / try / demand
TLSVerifyClient never

3.2) 创建 demo.ldif

$ gedit /etc/openldap/demo.ldif

# root
dn: dc=dlinkddns,dc=com
dc: dlinkddns
objectClass: top
objectClass: dcObject
objectClass: domain

# root - roles
dn: ou=roles,dc=dlinkddns,dc=com
ou: roles
objectClass: top
objectClass: organizationalUnit

# root - people
dn: ou=people,dc=dlinkddns,dc=com
ou: people
objectClass: top
objectClass: organizationalUnit

# root - roles - cn
dn: cn=Test Users,ou=roles,dc=dlinkddns,dc=com
objectClass: groupOfUniqueNames
cn: Test Users
uniqueMember: uid=sspecial,ou=people,dc=dlinkddns,dc=com
uniqueMember: uid=jbloggs,ou=people,dc=dlinkddns,dc=com

# root - roles - cn
dn: cn=Special Users,ou=roles,dc=dlinkddns,dc=com
objectClass: groupOfUniqueNames
cn: Special Users
uniqueMember: uid=sspecial,ou=people,dc=dlinkddns,dc=com

# root - roles - cn
dn: cn=Admin Users,ou=roles,dc=dlinkddns,dc=com
objectClass: groupOfUniqueNames
cn: Admin Users
uniqueMember: uid=admin,ou=people,dc=dlinkddns,dc=com

# root - people - uid
dn: uid=admin,ou=people,dc=dlinkddns,dc=com
objectClass: person
objectClass: inetOrgPerson
cn: State App
displayName: App Admin
givenName: App
mail: admin@fake.org
sn: Admin
uid: admin
userPassword: adminpassword

# root - people - uid
dn: uid=jbloggs,ou=people,dc=dlinkddns,dc=com
objectClass: person
objectClass: inetOrgPerson
cn: Joe Bloggs
displayName: Joe Bloggs
givenName: Joe
mail: jbloggs@fake.org
sn: Bloggs
uid: jbloggs
userPassword: password

# root - people - uid
dn: uid=sspecial,ou=people,dc=dlinkddns,dc=com
objectClass: person
objectClass: inetOrgPerson
cn: Super Special
displayName: Super Special
givenName: Super
mail: sspecial@fake.org
sn: Special
uid: sspecial
userPassword: password

3.3) 编辑 slapd.service

$ gedit /usr/lib/systemd/system/slapd.service

[Unit]
Description=OpenLDAP Server Daemon
After=syslog.target network-online.target
Documentation=man:slapd
Documentation=man:slapd-config
Documentation=man:slapd-hdb
Documentation=man:slapd-mdb
Documentation=file:///usr/share/doc/openldap-servers/guide.html

[Service]
Type=forking
PIDFile=/var/run/openldap/slapd.pid
Environment="SLAPD_URLS=ldap:/// ldapi:///" "SLAPD_OPTIONS="
EnvironmentFile=/etc/sysconfig/slapd
ExecStartPre=/usr/libexec/openldap/check-config.sh
# ExecStart=/usr/sbin/slapd -u ldap -h ${SLAPD_URLS} $SLAPD_OPTIONS
ExecStart=/usr/sbin/slapd -u ldap -h "ldap:/// ldapi:/// ldaps:///" $SLAPD_OPTIONS

[Install]
WantedBy=multi-user.target

4. 撤除旧数据

$ rm -rf /etc/openldap/slapd.d/*
$ rm -rf /var/lib/ldap/*.mdb

5. 添加新数据

$ slaptest -f /etc/openldap/slapd.conf -F /etc/openldap/slapd.d
$ chown -R ldap:ldap /etc/openldap/slapd.d

$ slapadd -v -l /etc/openldap/demo.ldif

$ slapadd -f /etc/openldap/slapd.conf -l /etc/openldap/demo.ldif

$ chmod 777 /var/lib/ldap/*.mdb

6. 防火壁

CentOS / Fedora

$ systemctl start firewalld

$ firewall-cmd --get-active-zones
$ firewall-cmd --permanent --add-service={ldap,ldaps} --zone=home
$ firewall-cmd --reload

$ firewall-cmd --list-all --zone=home

7. 用 ldaps, 需要关闭 SELINUX

$ gedit /etc/sysconfig/selinux

SELINUX=disabled


8. 启动

$ systemctl start slapd

$ netstat -plnt

9. 客户端

http://jasonmun.blogspot.my/2017/01/linux-openldap-client.html

2017年1月29日星期日

Linux - Systemctl

Systemd 用于进程管理

$ su

列出
$ systemctl list-unit-files | grep enabled
$ systemctl list-unit-files | grep disabled

$ systemctl list-units --all

设置成开机启动
$ systemctl enable apache2
$ systemctl disable apache2

启动 / 关闭 / 状态
$ systemctl start apache2
$ systemctl stop apache2
$ systemctl status apache2

重载 / 重启 / 杀掉进程
$ systemctl reload apache2
$ systemctl restart apache2
$ systemctl kill apache2

2017年1月28日星期六

Subnet Mask

子网掩码 (Subnet Mask) 决定了能设置内网 IP 的数量

以下假设 IP 为 192.168.0.1
用不同的 IP和子网掩码, 其子网范围会有所变动

在子网掩码为 255.255.254.0/23, 其
IP 范围 为
192.168.0.0 - 192.168.0.255 和 192.168.1.1 - 192.168.1.254, 广播为 192.168.1.255
192.168.2.0 - 192.168.2.255 和 192.168.3.1 - 192.168.3.254, 广播为 192.168.3.255
192.168.4.0 - 192.168.4.255 和 192.168.5.1 - 192.168.5.254, 广播为 192.168.5.255

子网掩码
IP 范围 (如 IP 为 192.168.0.1)
广播
共 (可用 IP)
255.255.0.0/16192.168.0.1 - 192.168.255.254192.168.255.255
65534
255.255.128.0/17192.168.0.1 - 192.168.127.254192.168.127.255
32766
255.255.192.0/18192.168.0.1 - 192.168.63.254192.168.63.255
16382
255.255.224.0/19192.168.0.1 - 192.168.31.254192.168.31.255
8190
255.255.240.0/20192.168.0.1 - 192.168.15.254192.168.15.255
4094
255.255.248.0/21192.168.0.1 - 192.168.7.254192.168.7.255
2046
255.255.252.0/22192.168.0.1 - 192.168.3.254192.168.3.255
1022
255.255.254.0/23192.168.0.1 - 192.168.1.254192.168.1.255
510
255.255.255.0/24192.168.0.1 - 192.168.0.254192.168.0.255
254
255.255.255.128/25192.168.0.1 - 192.168.0.126192.168.0.127
126
255.255.255.192/26192.168.0.1 - 192.168.0.62192.168.0.63
62
255.255.255.224/27192.168.0.1 - 192.168.0.30192.168.0.31
30
255.255.255.240/28192.168.0.1 - 192.168.0.14192.168.0.15
14
255.255.255.248/29192.168.0.1 - 192.168.0.6192.168.0.7
6
255.255.255.252/30192.168.0.1 - 192.168.0.2192.168.0.3
2

Linux - Network Settings - 静态 IP 设置

静态 IP 设置也就是在内网将某台设备如 PC 给设置一个固定的 IP 地址
而路由器 MODEM 则可以做端口转向 (Port Forward) 
到这个 IP 的某个端口如 80 / 443 等

Ubuntu
http://jasonmun.blogspot.my/2017/01/ubuntu-network-settings-ip.html

CentOS / Fedora
http://jasonmun.blogspot.my/2017/01/centos-fedora-network-settings-ip.html

OpenSUSE
http://jasonmun.blogspot.my/2017/01/opensuse-network-settings.html

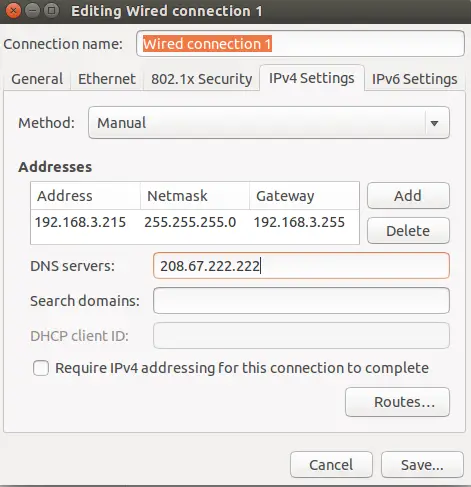
Ubuntu - Network Settings - 静态 IP 设置


$ su
$ gedit '/etc/NetworkManager/system-connections/Wired connection 1'

[connection]
id=Wired connection 1
uuid=2fe3ee09-2af6-3f0f-95a7-b2bfce16b0f7
type=ethernet
autoconnect-priority=-999
permissions=
secondaries=
timestamp=1485596065

[ethernet]
duplex=full
mac-address=00:0C:29:2E:CB:3C
mac-address-blacklist=

[ipv4]
address1=192.168.0.100/24,192.168.0.1
dns=192.168.0.1;
dns-search=
method=manual

[ipv6]
addr-gen-mode=stable-privacy
dns-search=
ip6-privacy=0
method=auto

systemctl restart network-manager


$ sudo gedit /etc/network/interfaces

auto lo
iface lo inet loopback

auto ens33
iface ens33 inet static
         address 192.168.0.100
         netmask 255.255.255.0
         gateway 192.168.0.1
dns-nameservers 192.168.0.1

$ systemctl restart networking

CentOS / Fedora - Network Settings - 静态 IP 设置


$ su
$ ls /etc/sysconfig/network-scripts/ifcfg-*
$ gedit /etc/sysconfig/network-scripts/ifcfg-ens33

CentOS
TYPE=Ethernet
BOOTPROTO=none
DEFROUTE=yes
IPV4_FAILURE_FATAL=no
IPV6INIT=yes
IPV6_AUTOCONF=yes
IPV6_DEFROUTE=yes
IPV6_FAILURE_FATAL=no
IPV6_ADDR_GEN_MODE=stable-privacy
NAME=ens33
UUID=316b162a-238a-444b-95d9-d81685570a23
DEVICE=ens33
ONBOOT=yes
IPADDR=192.168.0.100
PREFIX=24
GATEWAY=192.168.0.1
IPV6_PEERDNS=yes
IPV6_PEERROUTES=yes

Fedora
HWADDR=00:0C:29:EF:99:2B
TYPE=Ethernet
BOOTPROTO=none
DEFROUTE=yes
IPV4_FAILURE_FATAL=no
IPV6INIT=no
IPV6_AUTOCONF=yes
IPV6_DEFROUTE=yes
IPV6_FAILURE_FATAL=no
IPV6_ADDR_GEN_MODE=stable-privacy
NAME=ens33
UUID=79df6744-2e48-3bc6-b1e3-a86e2fc03924
ONBOOT=yes
AUTOCONNECT_PRIORITY=-999
ZONE=home
MACADDR=00:0C:29:EF:99:2B
IPV6_PEERDNS=yes
IPV6_PEERROUTES=yes
DNS1=192.168.0.1
IPADDR=192.168.0.100
PREFIX=24
GATEWAY=192.168.0.1

$ systemctl restart network

Ubuntu - Lighttpd - 编译所需依赖库

$ apt install gcc make libglib2.0-0 gzip openssl zlib1g

$ cd /home/username/Downloads

libxml2
$ wget ftp://xmlsoft.org/libxml2/libxml2-2.9.4.tar.gz
$ tar zxvf libxml2-2.9.4.tar.gz
$ cd libxml2-2.9.4
$ ./configure
$ make && make install

libuuid
$ wget http://nchc.dl.sourceforge.net/project/libuuid/libuuid-1.0.3.tar.gz
$ tar zxvf libuuid-1.0.3.tar.gz
$ cd libuuid-1.0.3
$ ./configure
$ make && make install

pcre
$ wget ftp://ftp.csx.cam.ac.uk/pub/software/programming/pcre/pcre-8.40.tar.gz
$ tar zxvf pcre-8.40.tar.gz
$ cd pcre-8.40
$ ./configure
$ make && make install

sqlite3
$ wget http://www.sqlite.org/snapshot/sqlite-snapshot-201701170010.tar.gz
$ tar zxvf sqlite-snapshot-201701170010.tar.gz
$ cd sqlite-snapshot-201701170010
$ ./configure
$ make && make install

bzip2
$ wget http://www.bzip.org/1.0.6/bzip2-1.0.6.tar.gz
$ tar zxvf bzip2-1.0.6.tar.gz
$ cd bzip2-1.0.6

$ gedit Makefile

# 在 CC=gcc 后加上 -fPIC
CC=gcc -fPIC

$ make clean
$ make && make install

Lighttpd 编译与安装
http://jasonmun.blogspot.my/2017/01/linux-lighttpd_25.html

OpenSUSE - Network Settings - 静态 IP 设置


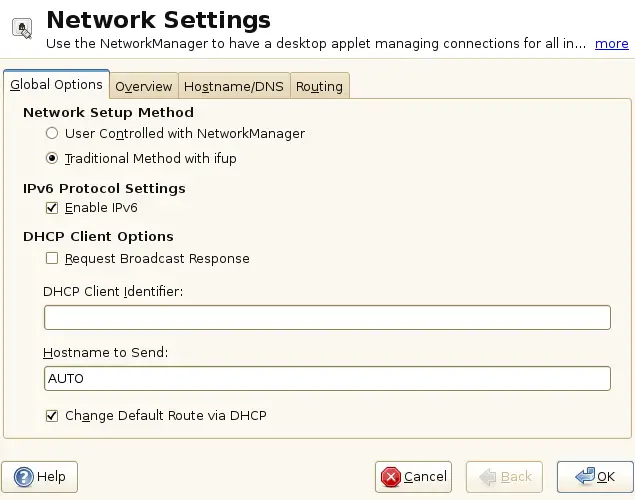
YaST2 - Network Settings

Global Options
IPv6 Protocol Settings - Enable IPv6 (uncheck)
DHCP Client Options - Change Default Route via DHCP (uncheck)

Overview - Edit - Statically Assigned IP Address
IP Address: 192.168.0.100
Subnet Mask: 255.255.255.0/24
Hostname: member.dlinkddns.com

Hostname/DNS - Hostname and Domain Name
Hostname: member
Domain Name: dlinkddns.com

Routing
Default IPv4 Gateway: 192.168.0.1
Device: eth0

$ su

$ gedit /etc/hosts

192.168.0.100   member.dlinkddns.com

$ gedit /etc/sysconfig/network/ifcfg-eth0

BOOTPROTO='static'
BROADCAST=''
ETHTOOL_OPTIONS=''
IPADDR='192.168.0.100/24'
MTU=''
NAME=''
NETMASK=''
NETWORK=''
REMOTE_IPADDR=''
STARTMODE='auto'
DHCLIENT_SET_DEFAULT_ROUTE='yes'
PREFIXLEN='24'


$ gedit /etc/sysconfig/network/ifroute-eth0

default 192.168.0.1 - eth0 


以上设置完后, 要改一改 resolv.conf

$ gedit /etc/sysconfig/network/config

NETCONFIG_DNS_STATIC_SERVERS="192.168.0.1"

$ netconfig update -f

看看 resolv.conf, 会多出一行

$ cat /etc/resolv.conf

nameserver 192.168.0.1

OpenSUSE - Firewall - 打开端口

YaST2 - Firewall

Start-Up 
Service Start - Enable Firewall Automatic Starting
Switch On and Off - Start Firewall Now

Interfaces
eth0 - Change.. - External Zone

Allowed Services
Advanced... - Additional Allowed Ports - TCP Ports - 80 443 - OK

2017年1月25日星期三

htpasswd 暴力破解法

1. 生成字典工具

Random Wordlist Generator (密码长度无限制)
https://sourceforge.net/projects/random-wordlist-generator

2. 将 word-list.txt 直接改名为 word-list.dic

3. L0phtCrack 6

http://www.upantool.com/qidong/qtqd/8408.html

a) 更换字典
Session Options - Dictionary Crack - Dictionary List - Enabled
- Remove - C:\Program Files (x86)\L0phtCrack 6\words-english.dic
- Add - word-list.dic

b) 选 htpasswd 文件
Import Hashes - Local machine - From Unix shadow fi... - Filename, Browse

c) 开始进行破解 Begin

Linux - LLMP - Lighttpd - 编译 / 安装

编译与安装 Lighttpd
同时加上 FastCgi (PHP) 和 WebDAV 模块

1. 编译与安装

$ su

1.1) 准备编译所需的依赖库

Ubuntu
http://jasonmun.blogspot.my/2017/01/ubuntu-lighttpd.html
CentOS
$ yum install gcc make glib2-devel gzip sqlite-devel libxml2-devel libuuid-devel
$ yum install openssl-devel pcre-devel zlib-devel bzip2-devel
Fedora
$ dnf install gcc make glib2-devel gzip sqlite-devel libxml2-devel libuuid-devel
$ dnf install openssl-devel pcre-devel zlib-devel bzip2-devel
OpenSUSE
$ zypper install gcc make glib2-devel gzip sqlite3-devel libxml2-devel libuuid-devel
$ zypper install openssl pcre-devel zlib-devel

另外, OpenSUSE 还需要..

$ cd /home/username/Downloads

openssl ( 没有这个, 以下 configure 会显示没有 openssl )
$ wget https://www.openssl.org/source/openssl-1.1.0c.tar.gz
$ tar zxvf openssl-1.1.0c.tar.gz
$ cd openssl-1.1.0c
$ ./config --prefix=/usr
$ make && make install

bzip2 的安装, 可看以上 Ubuntu 的部分

1.2) 下载 / 编译 / 安装

$ cd /home/username/Downloads

$ wget http://download.lighttpd.net/lighttpd/releases-1.4.x/lighttpd-1.4.45.tar.gz
$ tar zxvf lighttpd-1.4.45.tar.gz
$ cd lighttpd-1.4.45
$ ./configure --prefix=/usr/local/lighttpd --with-openssl --enable-lfs --disable-ipv6 --with-pcre --with-zlib --with-bzip2 --with-webdav-props --with-webdav-locks --enable-fastcgi --enable-force-cgi-redirect
$ make && make install

2. 准备

$ gedit /etc/hostname

member.dlinkddns.com

$ gedit /etc/hosts

127.0.0.1 member.dlinkddns.com

$ mkdir -p /etc/lighttpd/conf.d

$ cd ..

$ cp lighttpd-1.4.45/doc/config/conf.d/*.conf /etc/lighttpd/conf.d
$ cp lighttpd-1.4.45/doc/config/lighttpd.conf /etc/lighttpd/lighttpd.conf
$ cp lighttpd-1.4.45/doc/config/modules.conf /etc/lighttpd/modules.conf

$ mkdir /var/webdav
$ chmod 777 /var/webdav

$ printf "USER:$(openssl passwd -crypt PASSWORD)\n" >> /var/.htpasswd


Ubuntu
需要用到安装在 /usr/local/lib 里的动态库
如果要更新 Ubuntu 系统, 需要将以下这行取走
$ echo "/usr/local/lib" >> /etc/ld.so.conf.d/libc.conf
$ ldconfig

Ubuntu / OpenSUSE
$ groupadd lighttpd
$ useradd -r lighttpd

$ mkdir -p /var/cache/lighttpd/compress
$ mkdir -p /var/log/lighttpd
$ mkdir -p /var/lib/lighttpd
$ chmod 777 /var/lib/lighttpd

$ touch /var/log/lighttpd/error.log
$ chmod 666 /var/log/lighttpd/error.log

$ touch /var/log/lighttpd/access.log
$ chmod 666 /var/log/lighttpd/access.log

3. 设置

3.1) 编辑 lighttpd.conf

$ gedit /etc/lighttpd/lighttpd.conf

var.log_root    = "/var/log/lighttpd"

# OpenSUSE 用 /srv/www 
var.server_root = "/var/www"

var.state_dir   = "/var/run"
var.home_dir    = "/var/lib/lighttpd"
var.conf_dir    = "/etc/lighttpd"

var.vhosts_dir  = server_root + "/vhosts"
var.cache_dir   = "/var/cache/lighttpd"
var.socket_dir  = home_dir + "/sockets"

include "modules.conf"

server.port = 80
server.use-ipv6 = "disable"

server.bind = "member.dlinkddns.com"

server.username  = "lighttpd"
server.groupname = "lighttpd"

# OpenSUSE 用 server_root + "/htdocs" 即为 /srv/www/htdocs
# Ubuntu / CentOS / Fedora 用 server_root + "/lighttpd" 即为 /var/www/lighttpd, 我改为 /var/www/html
server.document-root = server_root + "/html"

server.pid-file = state_dir + "/lighttpd.pid"

server.errorlog  = log_root + "/error.log"

include "conf.d/access_log.conf"
include "conf.d/debug.conf"

server.event-handler = "linux-sysepoll"
server.network-backend = "sendfile"
server.max-fds = 2048
server.stat-cache-engine = "simple"
server.max-connections = 1024

index-file.names += (
  "index.xhtml", "index.html", "index.htm", "default.htm", "index.php"
)

url.access-deny  = ( "~", ".inc" )

$HTTP["url"] =~ "\.pdf$" {
       server.range-requests = "disable"
}

static-file.exclude-extensions = ( ".php", ".pl", ".fcgi", ".scgi" )

include "conf.d/mime.conf"
include "conf.d/dirlisting.conf"

server.follow-symlink = "enable"
server.upload-dirs = ( "/var/tmp" )

3.2) 编辑 modules.conf

$ gedit /etc/lighttpd/modules.conf

server.modules = (
        "mod_access",
        "mod_alias",
        "mod_auth",
        "mod_dirlisting",
        #  "mod_authn_file",
        #  "mod_evasive",
        "mod_redirect",
        "mod_rewrite",
        "mod_setenv",
        #  "mod_usertrack",
)

include "conf.d/webdav.conf"
include "conf.d/compress.conf"
include "conf.d/fastcgi.conf"

3.3) 编辑 webdav.conf

$ gedit /etc/lighttpd/conf.d/webdav.conf

server.modules += ( "mod_webdav" )

$HTTP["host"] == "member.dlinkddns.com" {
       alias.url = ( "/webdav" => "/var/webdav" )
       $HTTP["url"] =~ "^/webdav($|/)" {
              server.document-root = "/var/webdav"
               dir-listing.activate = "enable"
               webdav.activate = "enable"
               webdav.is-readonly = "disable"
               webdav.sqlite-db-name = home_dir + "/webdav.db"
               auth.backend = "htpasswd"
               auth.backend.htpasswd.userfile = "/var/.htpasswd"
               auth.require = ( "" => ( "method" => "basic",
                                        "realm" => "webdav",
                                        "require" => "valid-user" ) )
       }
}

3.4) 编辑 php.ini (PHP) / www.conf (PHP-FPM) / fastcgi.conf

Ubuntu (PHP-FPM)
$ gedit /etc/php/7.0/fpm/pool.d/www.conf

listen = /run/php/php7.0-fpm.sock

listen.owner = lighttpd
listen.group = lighttpd
listen.mode = 0666

user = lighttpd
group = lighttpd


看 PHP + MySql 安装与设置部分
http://jasonmun.blogspot.my/2017/01/linux-lighttpd.html

检查 lighttpd 的设置
/usr/local/lighttpd/sbin/lighttpd -t -f /etc/lighttpd/lighttpd.conf

4. 启动 (手动 / 自动)

重启 PHP-FPM
Ubuntu
$ systemctl restart php7.0-fpm
其它 Linux
$ systemctl restart php-fpm

4.1) 手动

$ /usr/local/lighttpd/sbin/lighttpd -f /etc/lighttpd/lighttpd.conf
$ ps aux | grep lighttpd

4.2) 自动

$ cd /home/username/Downloads

4.2.1) rc 版

$ gedit lighttpd-1.4.45/doc/initscripts/rc.lighttpd.redhat

LIGHTTPD_CONF_PATH="/etc/lighttpd/lighttpd.conf"
lighttpd="/usr/local/lighttpd/sbin/lighttpd"

$ cp lighttpd-1.4.45/doc/initscripts/rc.lighttpd.redhat /etc/init.d/lighttpd
$ chmod a+rx /etc/init.d/lighttpd
$ cp -p lighttpd-1.4.45/doc/initscripts/sysconfig.lighttpd /etc/sysconfig/lighttpd

$ systemctl start lighttpd
$ systemctl enable lighttpd

4.2.2) systemd 版 (建议用这个)

$ gedit lighttpd-1.4.45/doc/systemd/lighttpd.service

[Unit]
Description=Lighttpd Daemon
After=network.target

[Service]
Type=simple
ExecStartPre=/usr/local/lighttpd/sbin/lighttpd -tt -f /etc/lighttpd/lighttpd.conf
ExecStart=/usr/local/lighttpd/sbin/lighttpd -D -f /etc/lighttpd/lighttpd.conf
Restart=on-failure

[Install]
WantedBy=multi-user.target

Ubuntu - $ mkdir -p /usr/lib/systemd/system

$ cp lighttpd-1.4.45/doc/systemd/lighttpd.service /usr/lib/systemd/system/lighttpd.service
$ chmod 644 /usr/lib/systemd/system/lighttpd.service

$ systemctl start lighttpd
$ systemctl enable lighttpd

5. HTTPS 设置

http://jasonmun.blogspot.my/2017/01/lets-encrypt-lighttpd-https.html

6. 防火壁 / 路由器

Ubuntu
$ systemctl start ufw

$ ufw allow 80/tcp
$ ufw allow 443/tcp


CentOS / Fedora
$ systemctl start firewalld

$ firewall-cmd --get-active-zones
$ firewall-cmd --permanent --add-service={http,https} --zone=home
$ firewall-cmd --reload
$ firewall-cmd --list-all --zone=home


OpenSUSE

路由器要做端口转向 (Port Forward)

7. 测试

$ gedit /var/www/html/test.php

<?php
phpinfo();
?>

https://member.dlinkddns.com/test.php
https://member.dlinkddns.com/webdav

8. 客户端 (Ubuntu 用 apt / CentOS 用 yum / Fedora 用 dnf / OpenSUSE 用 zypper)

$ yum install davfs2
$ mkdir /media/dav
$ mount -t davfs 
http://member.dlinkddns.com/webdav /media/dav

$ yum install cadaver
$ cadaver 
http://member.dlinkddns.com/webdav

BitKinex
http://www.bitkinex.com/download

WinSCP
https://winscp.net/eng/download.php